
How To Easily Add Animations in OutSystems
Have you ever wondered what could be that extra step to provide an easy on the eyes experience for your users and keep them coming back to your application? A well-placed animation may be just what you need!
OutSystems provides an out-of-the-box animation widget that allows you to easily add animations to your applications without needing to add jQuery or Javascript. In this article, we’ll go through examples on how to use this widget and expand its functionalities to add our own custom animations. Hopefully, by the end of our time together, you’ll develop an appreciation for animations and how they can have an important role in creating a seamless flow throughout your application and allow you to set yourself apart from competitors. A word of caution sometimes less is more.
WHAT ARE CSS ANIMATIONS, AND WHY DO THEY MATTER?
Animations in CSS are a way to add dynamic behavior to an otherwise static element. For example, they create movement in a webpage, guiding the user throughout its content and thus providing a more satisfying and interactive experience. We’ll be using primarily the CSS @keyframes at-rule for our animations. (More info here.)
CASE STUDY I - ADDING AN ANIMATION WITH THE ANIMATE WIDGET
For our first example, we’ll add a slide animation to the application logo on the login page by following the steps below:
Drag the Animate widget to the desired location on the webpage.
Place the content to be animated in the widget’s placeholder.
Specify the animation type, in this case, the LeftToRight animation. You may also specify the speed and the delay before the animation starts (you can check the OutSystems documentation regarding the widget here).
CASE STUDY II - TOGGLE AN ANIMATION ON AN EVENT
In this next example, we’re going to add an animation to the logo after the user clicks on the login button. We can achieve this with the following steps:
Add a local variable to the screen, in this case, IsEntryAnimation of type boolean with the default value set to True.
Add an If condition to the AnimationType expression of the Animate widget, e.g.:
If (IsEntryAnimation, Entities.AnimationType.LeftToRight, Entities.AnimationType.Spinner)
-
This will add a spin to the logo while the next page is loading.
- Add an assign in the desired action, in our example, the Login action. Change the value of the boolean IsEntryAnimation to False, this will toggle the animation when the user clicks the login button.
In OutSystems Reactive and Mobile applications, this method can be applied to all events not just the onclick event. Bear in mind that in Traditional Web applications, you’ll need to ajax refresh the widget.
CASE STUDY III - ADD A CUSTOM ANIMATION
We can do better! Let’s create our own custom animation to provide a different spin for the logo. In this example, we’ll explore how to expand the Animate widget.
Find the Animate widget on the right-hand side: it should be under the OutSystemsUI > Interaction flow. Right-click the widget and select Open In ‘OutsystemsUI’ module. A warning will be prompted saying this module isn’t editable, click Open a Clone.
Copy the Animate widget from the cloned module to your module and select a name of your choosing, in this example, we’ll call it CustomAnimations_Animate.
Replace the Animate widget with your new custom widget where you wish to add your animation.
In the data tab of the cloned module, under Database, copy the AnimationType static entity to your module and select a name of your choosing. We’ll call it CustomAnimations_Type.
Change the data type of the AnimationType input parameter in your custom widget to the identifier of your newly cloned static entity.
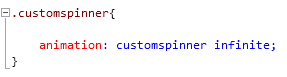
Add a record to your cloned static entity and give it a name, we’ll call it CustomSpinner. The record’s AnimationType attribute will be used to identify the CSS class where this animation is defined, in our case, it’s customspinner.
Open the CSS stylesheet of your custom animation widget and define the animation class. Specifying the animation property and its attributes with the proper syntax (more info about this property and its attributes here).
Make sure you add the visibility property to your animation class and set it to visible as, by default, OutSystems has the animate class used in the widget set to hidden.
Define the animation using the CSS @keyframes at-rule, this sets the properties of HTML elements at various steps for the duration of our animation. It’s usually done in percentages (%). Make sure the name you gave your new @keyframes definition is the one you are calling in the animation class you defined.
Update the If condition to reference the records of your new custom AnimationType static entity. In our case:
If(IsEntryAnimation, Entities.CustomAnimations_Type.LeftToRight, Entities.CustomAnimations_Type.CustomSpinner)
A drawback of this method is that OutSystems may update the Animate widget with new features that won’t be reflected on our custom widget.
CASE STUDY IV – CUSTOMIZE TO YOUR NEEDS
In this final example, we’ll recreate the animation displayed in the first GIF to tie the previous concepts together:

Add a new record for your custom AnimationType static entity, in this case, CustomSlide. In the attribute add customslide for the animation CSS class.
Specify the animation class with the animation properties and remember to set the visibility property to visible.
Open the clone of OutSystemsUI and copy the Speed static entity to your working module with a name of your choosing. This step is important so that we can create a new duration for our animation to last.
Add a new record to your newly cloned static entity named Slower. Specify in its attribute the class slower (this will be the CSS class for this record).
Update the Speed input data type on your custom animation widget to reference your custom Speed entity identifier.
Define the animation-duration property for the animation class with the animation setting using a composite selector of the two classes, in our case, .customslide.slower.
Define the animation using the CSS @keyframes at-rule.
Update the If condition of your widget instance with the new speed setting and the newly created custom animation.
TIPS AND REMINDERS FOR ANIMATIONS IN OUTSYSTEMS
A couple of reminders for implementing animations in OutSystems:
This article applies to Reactive and Mobile OutSystems 11 applications. For Traditional Web applications or other versions, the Animate widget and the logic may be slightly different, but the core concept still stands.
If you are having an issue with the Animate widget where your placeholder has a higher height than the content, try adding the following CSS to your theme, this may be useful in case you are dealing with rotations.

If you are trying to trigger an animation only on specific conditions, then it might be useful to add a None record to your custom AnimationType with value none and add the following CSS to your theme.

The @keyframes at-rule is widely compatible with most browsers ( for more information on compatibility, check here).
I hope you enjoyed this introduction to CSS animations in OutSystems and found some inspiration for your creative work.
You can get the application module used to create these animations here.
Thank you for reading!
Like this article? Share it:


