
How to make sure a heavy Timer doesn’t misbehave in the OutSystems Platform
Whenever we need to process a lot of data, a best practice is to have that done in the background with a Heavy Timer. As its name indicates, a Heavy Timer is a Timer used to process heavy, intensive operations. Since we don’t know the amount of data we will need to process in runtime, there are some things we can do to ensure our Timer follows the following four requirements:
Never times out
Doesn’t repeat work
Ensures completeness
Ensures data integrity
So, let’s see how our Timer’s timeout pattern handles each of these requirements.

Photo by chuttersnap on Unsplash
Never times out
By default, a Timer has a timeout setting of 20 mins. That does give us a lot of time but does not guarantee it’s enough to handle all the operations. We could increase that time, but that requires always checking the logs to see if we have enough time for all our data. It will also lock one of the three available slots (by default) for Timers, so it might delay the execution of a more important timer…
We handle all this by saving the timestamp of when our Timer started in a variable right at the beginning of our action. Then take a batch of records, process them, and after check if we’re reaching the Timeout.
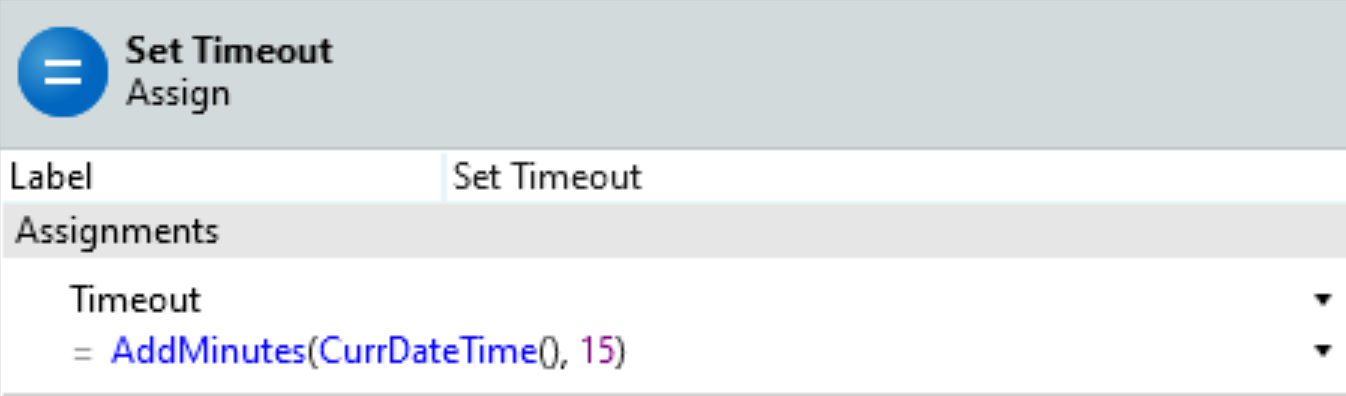
If we’re close to the timeout, we wake the Timer again avoiding a timeout.
Another way our Timer can reach a timeout is on the database transactions (default 30s). But since this method uses batches, all we need to do is ensure that we grab a small enough batch from the database, and that way, we guarantee we do not hit that timeout. Also, by using Update or Inserts in advanced queries instead of the entity actions, we speed up the process a bit.
Doesn’t repeat work
Since we can run the same Timer multiple times, we need to be sure we’re not processing over and over the same records. Hence, we need to guarantee we either mark a record as processed or delete it. Either way, we need to make sure that when we query the database for further records, these no longer show up.
The most common ways are either by deleting the processed record or using a Boolean attribute. However, we can also have an attribute [ProcessedOn] that we update with the current DateTime, and then in our query, we filter for Transactions that have that field set to the null date.
Ensures completeness
Since we have a Timer that keeps waking himself up, we need to be sure that it won’t stop the process until we’re positive that all records are processed. On the other hand, we really want to stop at some point and not have the Timer hogging resources indefinitely. Therefore, a check for records that fit the criteria should be included, and if none are found, the Timer should be stopped.
Ensures data integrity
When processing our data, we want to be sure that the database is up to date on the latest changes, so we don’t process the same record twice. Fortunately, the OutSystems platform assists us by only allowing one instance of each Timer to run at the same time. Hence, ensuring we’re not writing in parallel by accident. Usually, the database Write transaction commits at the end of the action, notwithstanding, we should have the database up to date while we’re checking. For that, we use the Commit transaction action at the end of every cycle, ensuring that everything we’ve done until that point is saved. It turns out, using the Commit Transaction action is also handy in case of an unexpected timeout, guaranteeing we don’t have to start processing our records from the beginning.
Bonus tip
Once, a teammate had a Timer in an endless loop. We tried to republish the module, disable the Timer, and even set the timeout to 0 seconds. However, the Timer was just too fast and kept calling itself nonstop. After a call to the infrastructure department with a request to restart the services in the Development environment and a whole lot of embarrassment, we were able to fix it. So, it might be handy to have a way to stop the Timer manually, especially during development.
In this case, we used a Site Property that we made sure to check every time a new batch of records were processed. That way, you can avoid the call of shame.
Well, I hope this has been useful to you, and I wish you good luck on your Timer adventures!
Also, if you want to take a deeper dive into making heavy Timers more robust, I recommend checking the following links:
Like this article? Share it:


