
How to optimize your queries in Outsystems: the ‘max records’ property

Imagine this: you’re developing an application with a very heavy database, and one of the requirements is to list thousands of records on one screen. Does this nightmare sound familiar to you? Did you ever struggle with timeouts when loading screens or table refreshes that take forever while using OutSystems? If you checked at least one of these boxes or just want to learn for future challenges, this article is for you.
To show you how you can optimize your queries to fetch only the records you want or how to apply some logic to manage heavy tables, let’s go on a trip where we’ll visit our beloved aggregates and, the ones feared by many, SQL queries (I have a surprise for you when we get there). We’ll be talking about the query ‘max records’ property in more detail and how you should use it to improve your queries performance. Although I’ll give you examples and case studies to make it as clear as possible, I highly recommend that you know basic SQL notions to understand some concepts approached in the article.
Shall we start?
‘Max records’ property and why you should work with it
First of all, if you work with OutSystems, you know that optimization is one of the core characteristics of the platform. But, if you don’t want to settle with the basics, you can add an “extra something” to help the execution time of your queries.
As you may know, aggregates and SQL queries have a max records property that’s used to limit the number of rows fetched from the database. It’s a pretty straightforward way to start optimizing your application. But why is this property so important?
When you are developing your applications, there’s usually at least one screen where you need to list some information and, for that, you only need to fetch a fixed set of rows at a time. So, taking this into consideration, this property must be consistent with your needs, and you should always define it. If you don’t, you'll be fetching more records than you probably need, and that results in unnecessary CPU usage, more IO consumption on the database, and unwanted memory take on the Web server.
Imagine that you only need one record for a form screen. Why would you fetch one hundred records?
You’ll probably say that it’s easier said than done, and you sometimes forget to set the max records of your queries. For that, I have something that can help you: our trusted friend, the Architecture Dashboard.
If you already used or heard of it, you know that it’s a tool that can also help you with your query optimization. If you never heard of it, you’re missing out big time. And how can this tool help you with this matter in your hands? If you don’t set the max records of your queries, a warning will appear on your application’s report stating “unlimited records in Aggregate” or “unlimited records in SQL query”, because it affects the performance of your application.
Optimizing aggregates
As you may know, aggregates are user-friendly, highly optimized, and easy to maintain queries, and there are some performance best practices that you should follow when working with them.
For our trip down the query optimization road, specifically using the ‘max records’ property, here are some recommendations that you should follow:
If you’re working with a form screen or some other development that requires only one record, set the ‘max records’ property to one and filter your aggregate using an identifier parameter, as shown in the example below. This way, the database will only fetch the record you need;


If you don’t have that many records and want to fetch them all for a list, you can set the max records to zero, and it will return all the records from the database (this happens with server-side aggregates);
If the ‘max records’ property is undefined and your aggregate isn’t isolated (in a server action, for example) and is associated with a widget, the default value will be the widget’s start index + its line count + one. Again, this only happens if your aggregate isn’t isolated, but you should set it anyways instead of leaving it with its default value;
When having a considerable amount of records (but not thousands, please!), and you need to have a table or a list on your screen, you can apply some logic using the aggregate’s max records and table’s start index properties, like so:
Case Study I - Aggregates
Imagine you’re developing an application to list all your favorite songs, their albums, and artists. You’ll probably want to list them all and, for that, you may need to apply some tricks to optimize data fetching.
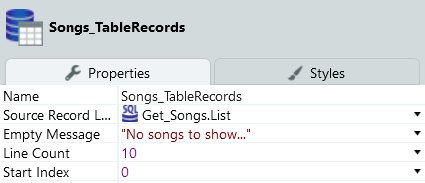
As we already talked about, one important point is to set the aggregate’s max records and, if you have your aggregate directly in your screen’s preparation, you should use the List_Navigation_GetStartIndex function combined with the TableRecords.LineCount to match the number of records presented by the table on your screen, as shown in the image below.

This way, your aggregate will only fetch the records you need to display, according to the properties you set for your table.
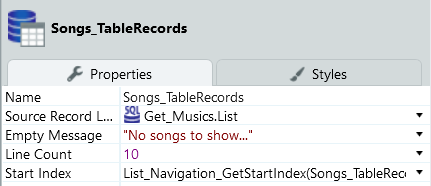
For this example:
table line count is ten records;
table ‘start index’ is set using the function;List_Navigation_GetStartIndex, as you can see in the image.
Considering these properties, your preparation’s aggregate will fetch eleven records when loading the screen: zero from the function + ten from the table’s line count and + one (to guarantee that your query fetches all the records up to the records that are displayed on the table). This logic should also be applied to the max records of the “refresh data” node of your pagination action.
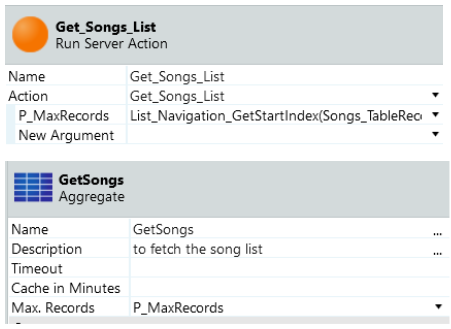
If you need to have a query like this in a service, or you don’t have the aggregate in your preparation, and you have it isolated in a server action, you can still use this logic to set the aggregates max records. If you are familiar with OutSystems performance best practices, you know that you shouldn’t isolate aggregates since the platform loses the ability to optimize the number of fields to fetch. But sometimes we have to, due to clients’ standards and patterns. So if you find yourself in a situation like this, send this custom max records value by input and set it inside the server action.
Optimizing SQL queries
In case you need more flexibility to manipulate your data or your desired output requires a more complex query to achieve it, SQL queries are here to help you. Just like it happens with aggregates, there are some OutSystems best practices directly related to SQL queries, but for now, let’s continue talking about performance optimization and max records property.
Like aggregates, SQL queries also have a max records property and, if not isolated and associated with a widget, the default value will be the widget’s start index + it’s line count + one, just like with aggregates. But it’s not as simple to set, and it isn’t enough to limit the number of rows fetched. To set a limit for the number of records retrieved from the database, you’ll need to control the max records inside the query, and I’ll show you how (please note that I’ll be using a very simple query just for demonstration purposes. If your logic is quite simple, you should use an aggregate):
Case Study II - SQL queries (SQL Server)
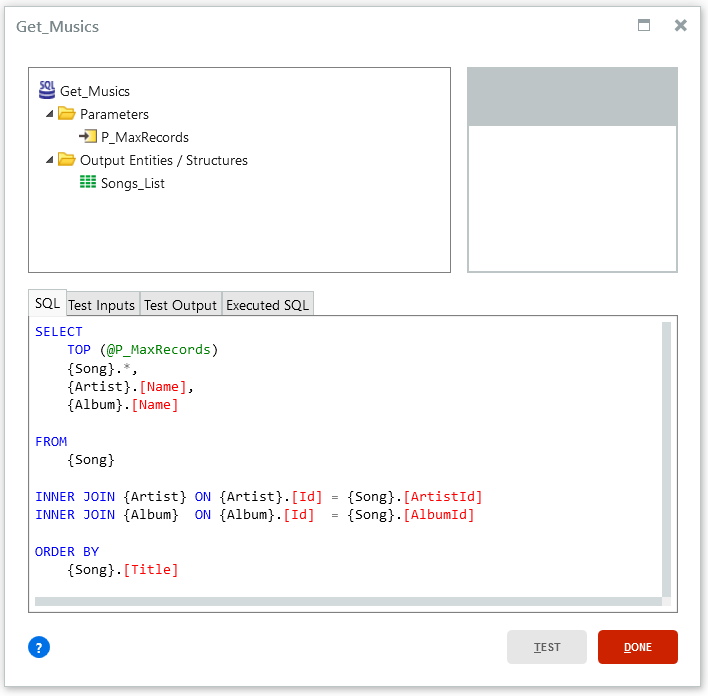
Picking up the theme of our previous case study, let’s continue developing our song list but, this time, with a SQL query.
As explained above, when working with SQL queries, it’s not enough to set the property ‘max records’, you’ll need to limit the number of records inside the query. Let me show you how:
set an input parameter in the query, and send the value you want, as shown in the image. This way, your ‘max records’ is a dynamic value, and coherent with your needs;
use the List_Navigation_GetStartIndex function combined with the TableRecords.LineCount, to get the right amount of data for your list (if you have the SQL directly in your screen’s preparation);
set it for the query input parameter, the query max records, and the refresh data max records.
Similar to the aggregates, if you need to isolate the SQL query in a server action, or use it in a service, create an input to send the value you want, set it in the query max records and your query input, and it’ll work just the same.
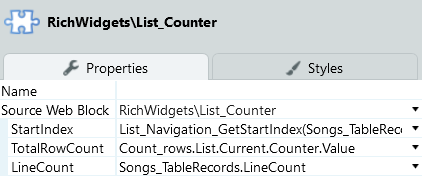
Now comes the detail you must not forget: if you’re using this logic, you’re limiting the number of records retrieved from the database and copied to the output record list and, because of that, you lose access to the total count of your records. However, you need that information for the list counter of your list’s pagination widgets. To work around this limitation, you’ll need to:
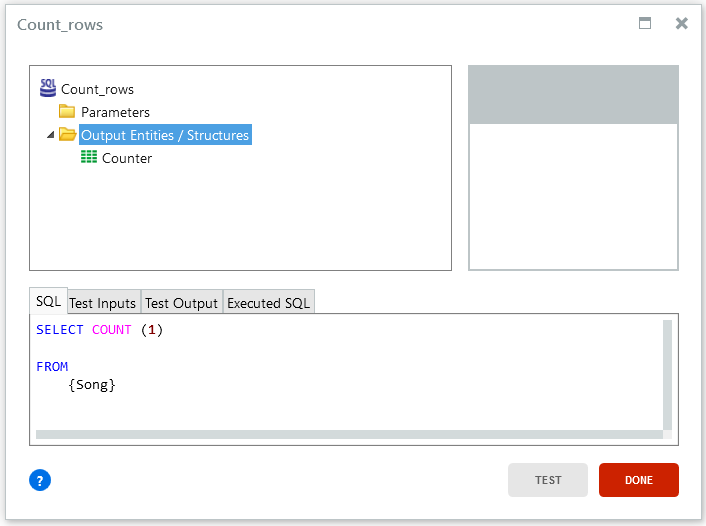
create a simple query to count the number of records and provide you that missing piece;
keep it as simple as possible since its sole purpose is to count rows;
set the ‘max records’ property to one since the query will only return one row with the result;
assign this query’s result to the TotalRowCount property of the list counter and list navigation widgets.
This way, you have your SQL query optimized and still have the total count of your records. Also, you don’t need to refresh this particular query when refreshing the list for the navigation since the total count of records doesn’t change while navigating through the list.
For this case, as you can see, it’s quite simple. But even if you’re working with complex queries, you should adapt them when doing a count statement. Replace all your column names with the count statement, remove unnecessary join conditions, and order by clauses.
These examples work well when you have a considerable amount of records, but not thousands. If you’re working with really heavy tables, you’ll probably want to fetch only the records you’re currently showing on your table. “Why?” you may ask. Well, imagine you have ten thousand songs to list. What would happen if a user wanted to look at the last page of your list? Most certainly a never-ending page load and timeout, not such a great user-experience. It happens because you’re only limiting the max records and, on the last page of your list, the max records will be the total number of records. Consequently, it can crash your application since performance decreases when page and record numbers increase.
To manage this, you need to go a little deeper and make some changes to the query that fetches the song list (no need to change the query that returns the count of records). This way, you can apply pagination inside the query, and retrieve only the records needed.
Case Study III - SQL queries with pagination
So, basically, what you need to do is tell the database which rows you want to retrieve, if you want from index zero to nine, or ten to nineteen, and so on. This way, you’ll never load more records than the ones you’re currently showing on your screen, if that’s what you want, of course.
Starting with the query:
you’ll need to create two input parameters: one for the minimum row and another for the maximum row, to set the range of records your query will fetch;
create a subquery inside your FROM statement, and declare a temporary value using the function ROW_NUMBER ( ) combined with OVER ( ) (as you can see in the image);
On the WHERE clause of your “outer query” use your new column and the two input parameters created previously. With the help of a BETWEEN, state that your column “NUMBER” will be between the minimum value parameter and the maximum value parameter.

With this ROW_NUMBER ( ) function, the value will be a sequential number of a row, in this case, ordered by the song identifier, meaning that each row will be numbered. You’ll need to give an alias to this new column - like NUMBER following this example - so you can use it later.
Don’t forget to give an alias to your ambiguous columns and your subquery, so your outer SELECT statement knows what you want your query to return.
This way, your query only returns the records with a row number between those two values.
It seems quite simple, right? But we’re not finished yet.
Now you’ll need to define the values for the input parameters and make some changes in the UI as well:
the minimum value input parameters will be the table’s start index, using the List_Navigation_GetStartIndex function, or List_Navigation_GetStartIndex function + one if the start index is different from zero (you don’t want to get repeated records on your list, right? - otherwise your tenth record on the first page will be your first on the second page). So, for the minimum value parameter, you’ll want to set something like this:

for the maximum value parameter and the max record property, apply the logic you already know by now, the List_Navigation_GetStartIndex function, combined with the TableRecords.LineCount, plus one.
don’t forget to also set these values on the refresh data node of your navigation action.
Since there’s no need to change the query to count the number of records, the TotalRowCount property of the list counter and list navigation widgets should stay the same as well, with the result of this counter query.
There’s just one more detail: the start index of your table must be set to zero, so all the logic you created depending on this value doesn’t break. And that’s it! You’ve applied pagination inside your query, and now your application is optimized and has better performance!
Case Study IV - SQL queries with pagination (ORACLE)
And now, the surprise I promised you: how to do all this in ORACLE. And why ORACLE, you might ask? Because sometimes, it’s not enough that you have to work with heavy databases, they are also in ORACLE (what a nightmare, right?!). It means, whenever you need to create a SQL query, you’ll need to use ORACLE language instead of the SQL one you’re probably used to.
Considering the logic we’ve been working on, the changes aren’t drastic: you just need to change the query that returns the song list since the count function is the same in both languages, and the parameters and UI settings are the same.
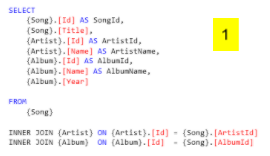
You’ll need three SELECT statements, one “outer” query, and two subqueries, and two input parameters to limit the maximum and minimum rows you’ll want to retrieve (I’ll use the same input parameters as in the previous case study).
So, let’s work on the query:
create your “main” query, with all the fields you want for your table, joins, where, and order by clauses (image 1);
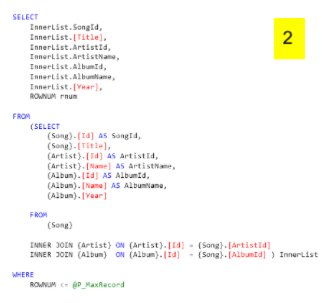
turn this query into a subquery:
wrap this query in ( );
give it an alias (I used “InnerList”);
create a second SELECT statement, equal to this one, with this first query in your FROM clause;
replace your table and column names with the aliases you’ve created before;
add an extra column to your SELECT statement: the ROWNUM pseudocolumn, with an alias “rnum” (in this example) to allow the pagination logic, as you can see in image 2;
create a WHERE clause to apply the first part of your pagination logic, where you’ll set the last row of the result set to fetch, by stating that the ROWNUM of this query will be less or equal to your maximum value input parameter.
like you did with the “main” query:
wrap this one in ( );
give it an alias (I used “OuterList”);
create a third SELECT statement, equal to this one but without the ROWNUM pseudocolumn, with all your previous logic in the FROM clause, as you can see in image 3;
replace your table and column names with the aliases you’ve created;
add a WHERE clause to set the first row of the result set to fetch, stating that the “rnum” (the ROWNUM alias created before) will be greater or equal to your minimum value input parameter.

This way, your query will always return the records with the row numbers in between the maximum and minimum values you’ve set without having to load the entire database to your screen.
And that’s it! You’ve applied pagination using ORACLE, and now your application is less of a nightmare.
Tips and tricks to achieve success
The Architecture Dashboard is a particularly useful monitoring tool capable of identifying numerous problems regarding performance, architecture, maintainability, and security while helping us follow OutSystems best practices. If you want to learn more about this tool, check out this document: Introduction to Architecture Dashboard.
When creating your queries, if you’re using the two queries logic (one for the counter and one for the list), don’t forget to filter both (if applicable). Although you should keep your counter query as simple as possible, you need to do the necessary joins and filters, if it influences your result.
In case you’re working with SQL and using the logic ROW_NUMBER ( ) combined with OVER ( ), and following the case study, take into consideration that you can use a PARTITION BY inside OVER ( ) to divide the result set to which the ROW_NUMBER ( ) function is applied. Since there’s no PARTITION BY specified in the example, all rows are treated as a single group.
Additionally, if you specify an ORDER BY in the OVER clause, it will order the rows in the PARTITION you’ve defined. You can always add an ORDER BY clause in the SELECT statement to order your query as you wish. If you want to take a closer look at these functions, I recommend the pages below:
If you’re working with an ORACLE database, keep in mind that ROWNUM can be tricky to implement since its value is not permanently assigned to a row and has a specific logic to assign a value to a row. If you want to know more about ROWNUM and how to use it, I suggest you take a look at the following pages and their examples:
Through this article, we approached very lightly the OutSystems Best Practices related to queries and their importance for application performance. If you want to know more about this, check out this document about Performance Best Practices - Queries for more information and examples.
Thanks!
Thank you for reading this article! I hope you learned something useful and, most of all enjoyed learning about how to optimize your queries in multiple ways. I wish you good luck on your journey through this performance world!
Like this article? Share it:


