
Crafting Custom Logging & Change Tracking in OutSystems — Part 1: The Core

In the dynamic world of OutSystems application development, creating effective logging and change-tracking components is not just expected but crucial. Each application demands a unique, tailor-made approach, and we often need additional features after implementation—a challenge that becomes increasingly complex over time.
Drawing from years of experience, I've developed a set of versatile patterns designed to integrate seamlessly into any application. These patterns are not only adaptable for end-users across technical and business domains but also efficient in managing (sub)status for BPT workflows.
This two-part series aims to guide you through the intricacies of establishing a robust logging and change-tracking system in OutSystems. In this first installment, we delve into the Core component, laying the groundwork for effective application management. The next part will shift our focus to the UI Layer and explore Use Case Patterns, further enhancing your toolkit for OutSystems development.
Core Data Model and Database Suggestions
First, we need a simple and robust data model; the example below is a good starting point.

Image 1 – Simple but robust data model
One main entity, Common Logging, supports a log entry with all necessary information to store, filter, and display later in plain text or HTML. It also includes a DatasetId, a DatasetName, and the dataset JSON to store the Dataset snapshot payload (usually small), which can later be used to compare track change entries for a specific dataset.
We also have a secondary entity, LoggingJSONPayload, to support, when necessary, a binary JSON payload, typically used for integration logs, like web services, containing that integration input and/or output payloads.
These two entities can be implemented in OutSystems' native data model. Still, to promote scalability and performance, they could be implemented in an external database with other types of database technologies, like NoSQL. Another good example would be MongoDB, with connectors already available in the OutSystems Forge, but there are many different options:
MarkLogic,
ScyllaDB,
Apache Cassandra,
Couchbase,
Amazon DynamoDB,
Redis,
Neo4j.
Besides the two main entities, we need static entities to support a log entry's different properties. The example in the image above is a good starting point containing the following concepts:
Log Level
Log level or severity of the error or log entry, like Warning, Information, or Error. This entity can also contain visual contexts like the icon name, background color, and icon color. It is handy for the UI component later.
Log Application
As the name indicates, this is where we have the different eligible applicational concepts that we want to group the log entries by. An application here is more of a concept than an OutSystems app because it can contain many layered apps like Core, UI, Workflow (BPT), etc.
Usually, when displaying logs later, they tend to be from a single application concept coupled with the Identifier field from the main entity. The identifier can be anything, like an actual Id or code, as long as it is unique to the applicational business object you want to display the logs for, for example, A Package Order ID from a retail store.
Log Type
This entity represents the type of log entry you want to display later to the user, like “Integration,” “Status Change,” or “User Interaction,” just to name a few examples.
These types allow visually differentiating the logs and filtering them by type later. Additionally, it supports visual context, like the icon name and color. This entity will be beneficial for the UI component later.
Log Scope [Optional]
This entity is not represented in the data model above because it was supposed to be a mixed log. However, it will be advantageous to include it when we want to present a log to a technical or business user, hiding some entries from End Users who won’t need them and thus removing unnecessary noise.
Examples of scopes: “End User,” “Technical,” or “Both.”
Core Logic
Regarding the implementation of the actual log action that will be used everywhere in your code, my suggestion is to use Service Actions since when you are trying to use them in an exception flow with an abort transaction, you probably still want to avoid aborting the transaction that saves the log entry. So, using a Service action, which is basically a web service call, runs in a different transaction and will ignore the abort transaction from the invoking logic.
Public Service Action
Another critical decision is to have one single generic Service Action for logging, agnostic of the Application, passed as an input, or having one logging action per Application, ditching the input. Both approaches are legitimate and can coexist, but having one action per Application is a better solution for development and ease of use. A developer can reference his Application with just the specific action for that app and probably have a custom Log Icon to detect a mistake quickly.
The logic for that Public Service action should look something like what is represented in the image below.
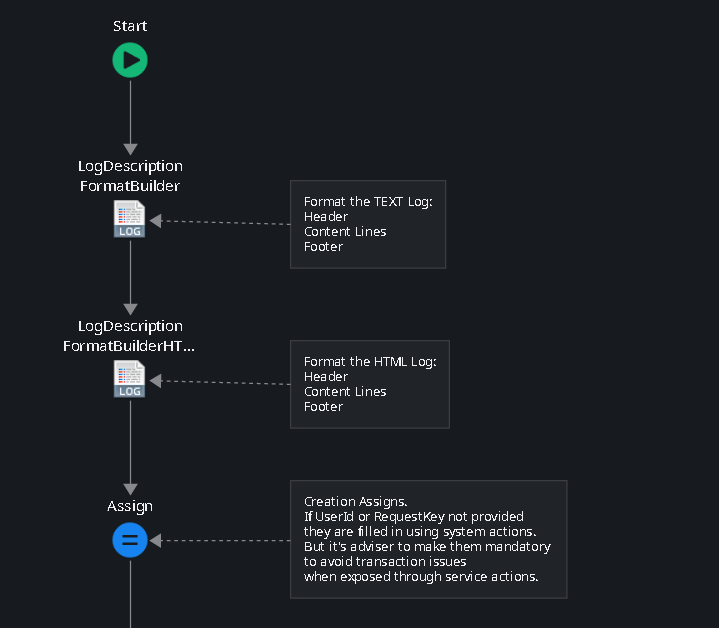
Image 2 – Public Service Action Logic
The first two actions are format builders for plain text and HTML that return a single text field formatted with standard spacing and line breaks so that all logs look the same regardless of whether they are presented later as text or HTML (with some generic CSS classes that will be used by your individual application CSS with different looks for those generic classes, fitting the style to the application individual needs).
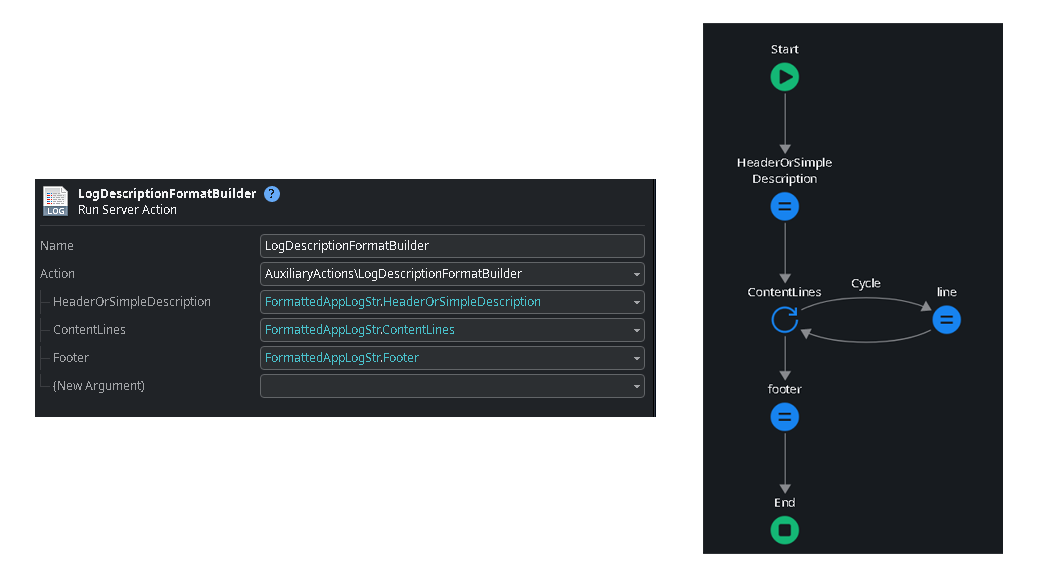
Image 3 – Plain text log format builder

Image 4 – HTML log format builder
After the format builder actions, we have the create action assignment of the log entry fields.

Image 5 – action assigning the log entry fields
The UserId and RequestKey should be mandatory input fields. We can use the system function GetUserId() to get the System UserId and Request_GetKey() from the PlatformRuntime_API extension.
After the assignment of the inputs, we have the JSON payload (integration logs) conversion to binary, if present, and the action encapsulating the creation of the log entry into Common Logging and the additional record into LoggingJSONPayload if needed.
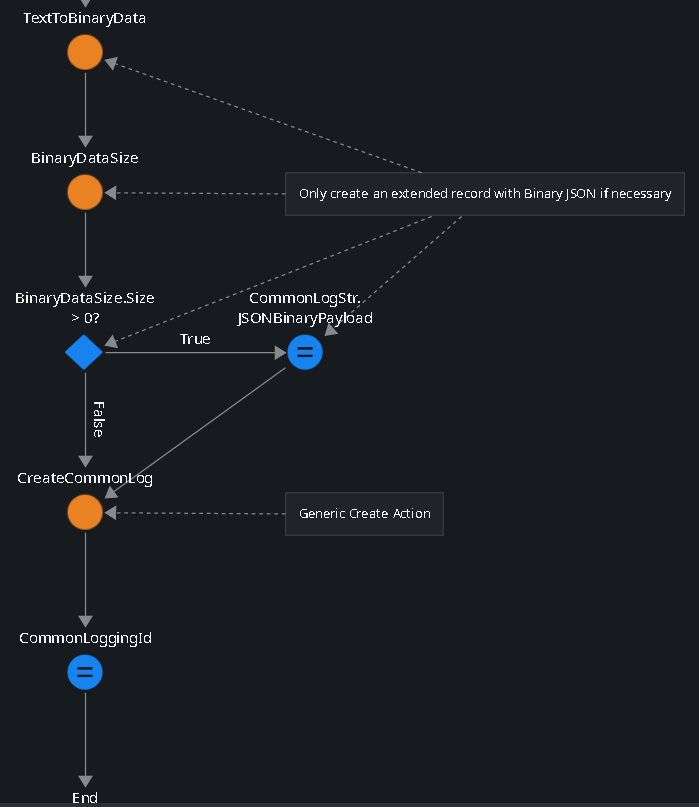
Image 6 – JSON payload conversion to binary
Auxiliary Actions
We need a few auxiliary actions to support these features: the format builder actions, already mentioned before, and one public action/function, ConcatenateJSONPayloads, to quickly merge two JSON payloads into one, usually used in integration log entries with complex input and output payloads.
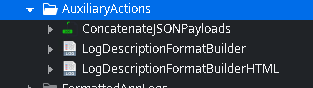
Image 7 – Auxiliary Actions
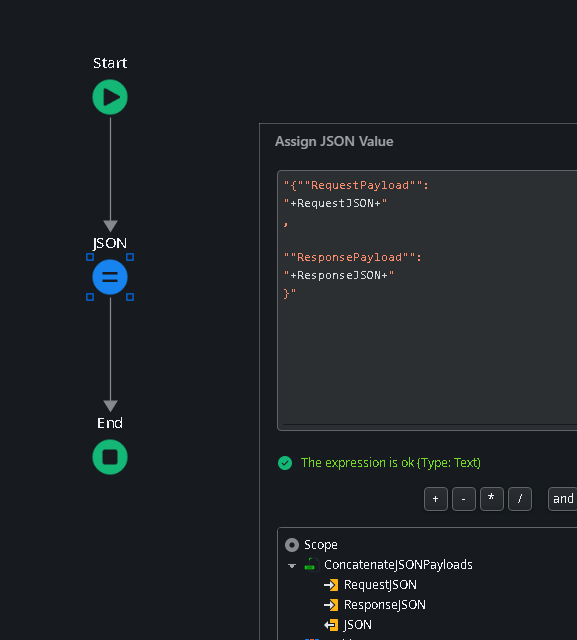
Image 8 – Merging two JSON payloads into one
Closing
I hope you found this first part of our series on logging and change tracking in OutSystems both informative and engaging. As we've only scratched the surface, I invite you to look out for the second part of this article. We'll delve into the UI Layer, discussing its challenges and presenting a few use case patterns. These insights will further demonstrate the practicality and flexibility of our approach. Thank you for reading, and I look forward to sharing more with you in the next installment.
Like this article? Share it:


