
How To Handle Dynamic Excel Spreadsheets On The Outsystems Platform

When importing or exporting an excel file through the built-in OutSystems feature, a data structure must be defined beforehand. Although this works for most situations, a different approach is needed when the number of columns is not specified or is data-dependent. So, how can we work around not using a known data structure? OutSystems has a fantastic developer community. When faced with a challenge, look there first. Typically, someone has already been through the same, solved it, and shared a solution with the rest of the community on the OutSystems Forge. For our particular need, we will use a component that allows us to handle excel files with as many columns as needed without requiring a data structure, effectively exporting and importing structureless, dynamic excel files.
A quick look at the built-in functionality and alternatives
Using the built-in RecordListToExcel widget when exporting from an Aggregate or Advanced SQL Query, the excel file will inherit the structure from the query (figure 1). Thus, the built-in feature does not support situations where the record list rows have a different number of columns.
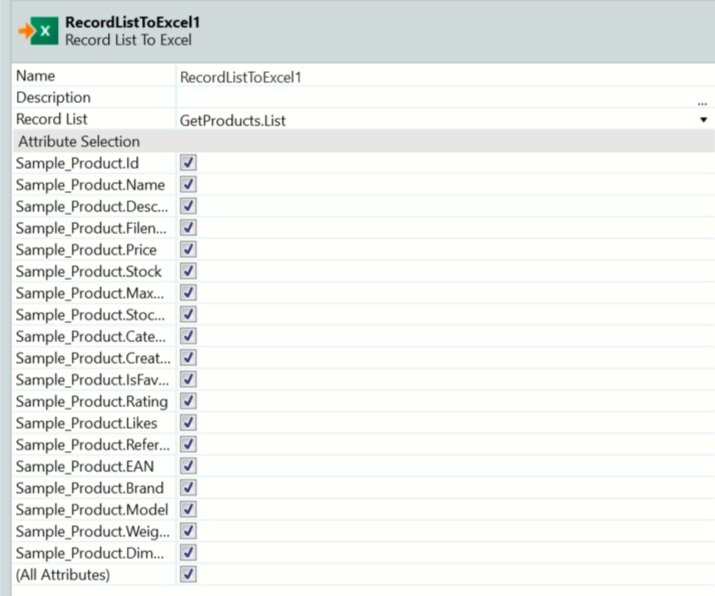
Picture 1 – RecordListToExcel export
Correspondingly, when importing an excel file, the record definition is required (figure 2). Thus, it also does not support the above scenario, where each row can have a different number of columns.
While this built-in functionality is generally enough for simple exports and imports, it can be lacking in cases where more tailored approaches are needed, for instance, demanding specific templates that coexist with other software.
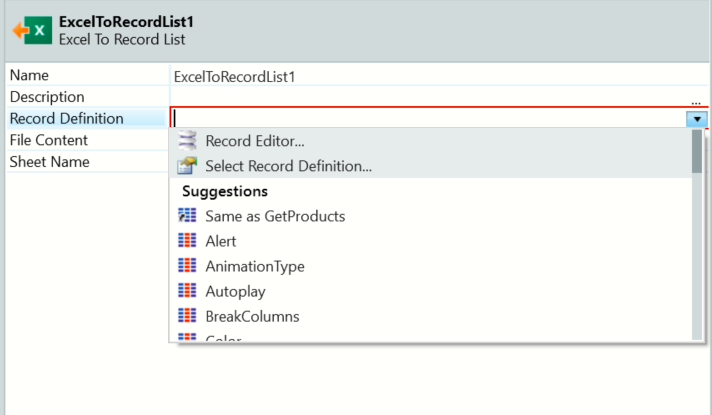
Figure 2 - ExcelToRecordList import
When can this become an issue?
When building an import or export mechanism where each row requires a specific number of columns, we need a method to handle the data without relying on fixed structures.
Take the following example, where we are importing a list of packages and their respective colors (figure 3):
“Premium Package” has Blue, Red, and White;
“Plus Package” has Black, Yellow, White, and Green.
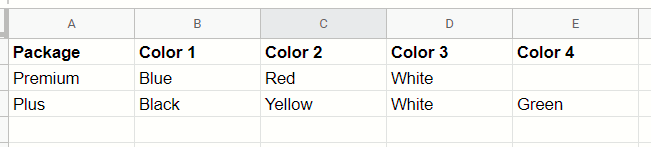
Figure 3 - Test data
Each package can have any number of colors, meaning the total number of columns per row depends on the data. How do we handle colors in each package when creating the record definition?
Do we define a maximum number of possible colors per package and add all fields to a static structure? What if we fail to predict the maximum number of colors? This is when using a data-driven approach may be helpful.
Downsides Of A Custom Approach
While a more finely-tuned approach may seem appealing, it should be used sparingly when necessary due to the complexity and time needed. A new component should only be developed if, after a thorough evaluation of the existing ones, none works.
We will use the Advanced Excel component for the case we are dealing with in this article. However, it should be considered that Advanced Excel is an unofficial forge component. Even if it is maintained and updated often, it is not supported and, as such, could not work as expected.
For instance, regarding how the sheet properties are read: simply using backspace to delete data instead of the excel delete cell feature may result in empty rows being found by the Advanced Excel component. Thus, if not appropriately handled, empty lines could be imported.
How-To handle Data-driven Dynamic Excel Files
As stated before, we will use the Advanced Excel Component found on the OutSystems Forge to handle our data-drive dynamic Excel files.
Firstly, open OutSystems Service Studio and install the Advanced Excel extension from the forge.
After the extension is installed, reference the actions Worksheet_Select, Cell_Write, Cell_WriteRange, Workbook_GetBinaryData, and Workbook_Open(figure 4).

Figure 4 - Advanced Excel dependencies
The actions Worksheet_GetProperties and Cell_Read will also be needed for the import process.
Regarding the data fetch for exporting, it should be noted that the dynamic fields will be fetched within the loop per row, so the data fetched before starting the export should be the master records.
Exporting Dynamic Excel Files
Let’s look at the following example, a simple test application where a package has multiple colors, and the goal is to generate an excel file with that information.
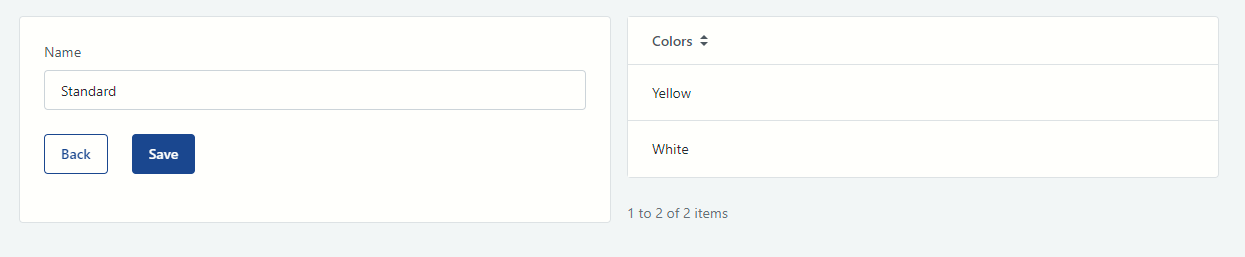
Figure 5 - Test application
The package Standard has the colors Yellow and White (figure 5). Consequently, the resulting excel should contain three columns and one row (Name, Color1, and Color2).
We’ll be looking at two different methods. The first uses a pre-existing excel file (template) as a resource, while the second generates a file without having any predefined structure or template.
#1 – Exporting Based On A Template
1. Creating A Template
First, we will create the template excel file containing the headers for common fields, the styling of the cells, the type and format, and any other data that may be needed before exporting. Next, we import it as a resource on the data tab of the Service Studio.
Common fields are present in all rows of data. In our example, the package name is a field common to all the rows. Thus our resource will have it in the header beforehand (figure 6). The file and sheet names can also be saved in the template.
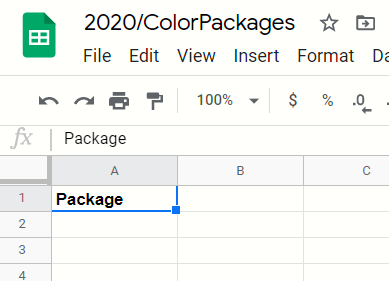
Figure 6 - Packages template
2. Using The Template
Once the template has been uploaded, we can start working on the export process. After fetching the data to export, we need to access the template and begin inserting data in each cell.
The headers should match the number of columns. To do this, we find the maximum number of colors for any given item being exported and write the corresponding headers.
Our export action will start by opening the excel file and selecting the sheet (figures 7 and 8).
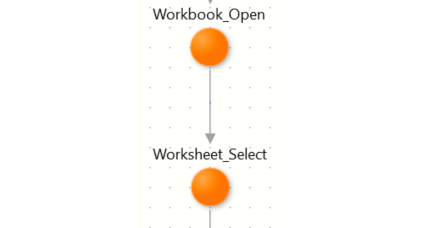
Figure 7 - Workbook_Open action

Figure 8 - Opening an excel binary flow
In this case, the worksheet is the only one in the excel file. Thus we will use index 1. A Worksheet name or a different position may also be used (figure 9).
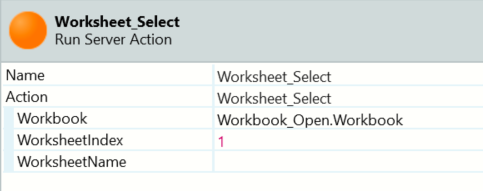
Figure 9 - Worksheet_Select action
After opening the worksheet, we create two control variables—IterationControl and ColumnControl—to track which cell is being written (figure 10).

Figure 10 - Control variables
The start column is dependent on the template. In our case, the first column already has the header Package. Thus our start column for the headers will be 2 (figure 11).

Figure 11 - Header writing flow - Start Column
With our control variables in place, a simple ad-hoc loop (figure 12) is used to write all the headers. The row is, of course, 1, and the column will increase on every iteration. The variable IterationControl is used to limit the number of headers written and to iterate the headers themselves, to produce “Color 1, Color 2”.
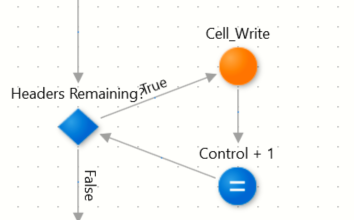
Figure 12 - Header writing flow - simple ad-hoc loop
After writing the headers (figure 13), we can reuse the variables for the next section.
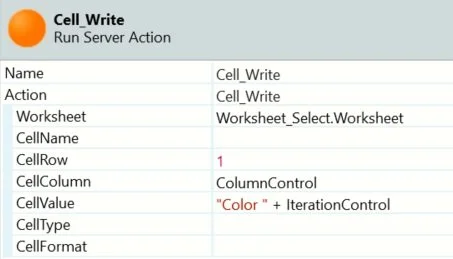
Figure 13 - Cell_Write action
Since we won’t need to control the iterations with a variable for the next loop, we can use it to track the rows instead, beginning at Row 2 (Row 1 is the header). Depending on how we will write the common fields, the start column or ColumnControl should also be adjusted (for the following method, it’ll start at 2 since the first column will be written in bulk).
Before we write all the colors for each row, we have to write the common fields, in this case, the package names (figure 14). There are two approaches to this problem: Write the data cell by cell inside the loop or use the Cell_WriteRange action.

Figure 14 - Common fields variable
By utilizing Cell_WriteRange, we can write a large set of data at once without navigating cell by cell. Thus, a structure containing the fields being written in bulk and a local variable of type [Structure] Record List are created (figure 15). It is crucial to take these these steps. Otherwise, the extension will fail to write the fields.

Figure 15 - Common fields variable
The Package names get assigned to this variable. Using the function ToObject(), we feed the local variable to the Cell_WriteRange action (figure 16), which writes all the necessary cells and columns based on the number of fields and rows inside the record list.
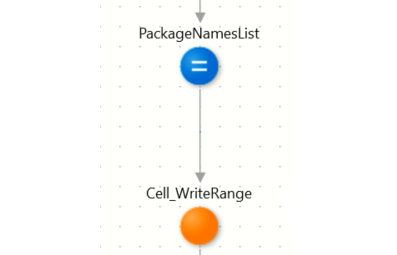
Figure 16 - Writing common fields flow
RowStart is set to 2 (figure 17), as the first row has the headers. The columns adjust automatically based on the fields provided.
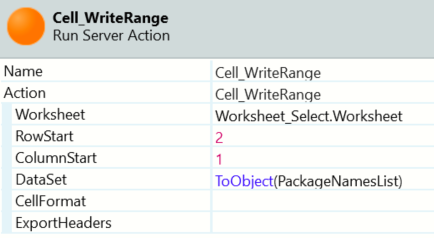
Figure 17 - Cell_WriteRange action
After our Common fields are written in bulk, it writes the dynamic fields (figure 18).
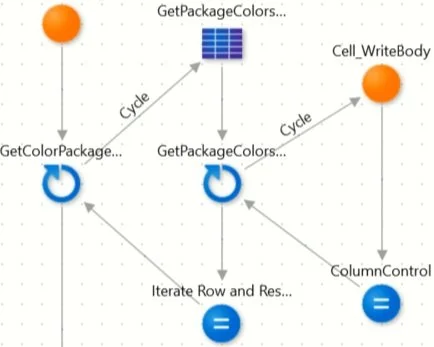
Figure 18 - Writing dynamic fields flow
For each master record Color Package, we want to fetch and export each of its colors in the same row. We again use the Cell_Write action with column and row controls (figure 19).
After writing each cell in a row, the ColumnControl advances by 1. Once all the colors for a row are written, the IterationControl increases by 1, and the ColumnControl resets to 2. Thus, iterating through each column in a row before switching to the next row and going back to the first Color column.

Figure 19 - Cell_Write action used to write the dynamic fields
The final result is the expected excel with one package and two colors (figure 20).
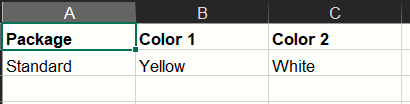
Figure 20 - Export result
Creating the Premium Package and rerunning the export results in the color columns increasing by 1 (figure 21).

Figure 21 - Export result with added color
#2 – Exporting without a template
While exporting without a template is more time-consuming, it is doable. Instead of creating and uploading a template, the headers for the Common fields need to be written one by one with the Cell_Write action or, on recent versions of AdvancedExcel, using the Cell_WriteRange with the property ExportHeaders set to True. However, this does not yield the best results.
A quick test shows that exporting the headers with this approach doesn't yield the most polished results (figures 22 and 23).
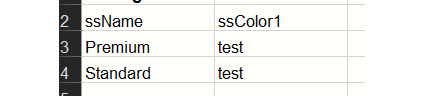
Figure 22 - Cell_WriteRange headers test result

Figure 23 - Cell_WriteRange headers test result
Importing Dynamic Excel Files
When exporting an excel file, we can calculate the number of columns as the data is available. However, how can we determine how many columns per row should be read without reading them first? We will explain this case of importing dynamic data in this section.
#1 – Get The File Properties
Firstly, we will use the action Worksheet_GetProperties to fetch the File properties. This action looks at the excel file that the user is trying to import and then outputs several properties, including its dimensions, which gives us the number of rows and columns on the file.
Similarly to what we did previously, we open the workbook. However, in this situation, we will use the binary of the received excel, select the worksheet we’d like to import from, and finally use the Worksheet_GetProperties.
We already know the number of rows and columns in the file at this stage. The import process simply iterates through each row and reads as many columns as we know exist, considering the number of common fields present.
As previously, the actions Workbook_Open and Worksheet_Select should be used, as well as the same variable setup.
If no common fields are present, the section below can be skipped.
#2 – Reading Common Fields
For our scenario, we know the first column always contains the name, so we read the first column at the start of our iteration.
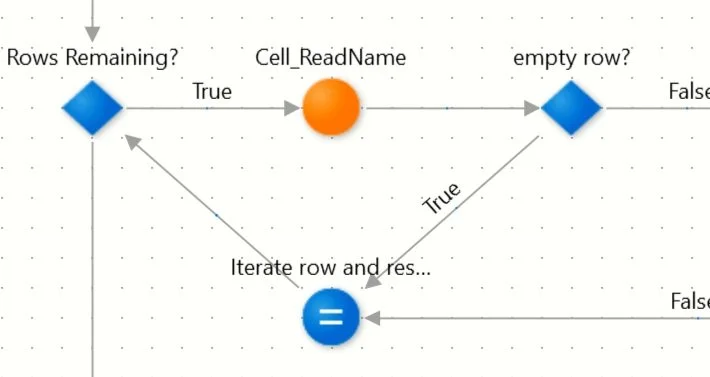
Figure 24 - Flow to read common fields on import
Notice how we are checking if the row is empty despite knowing how many rows should contain data. This is due to the blank row issue explained above, where sometimes the dimension data does not match the populated rows (figure 24).

Figure 25 - Loop to read and create the common fields
Next, more Cell_Read actions should be used to read additional Common fields with the column specified. In this example, there is only one Common field. Thus, we always read the first column of whatever row is being iterated starting from 2 (since the first is the header). Any validations can be done here as usual, and, as a best practice, the Cell_Read actions should be wrapped in another action to keep the loop code neat (figure 25).
#3 – Reading the dynamic fields
Reading each row's dynamic columns (figure 26) follows the same process. Still, the columns are iterated within one row until the maximum number of columns for the sheet properties has been reached or the columns no longer have data for that row.

Figure 26 - Flow to read dynamic fields

Figure 27 - Cell_Read action being used to read dynamic colors

Figure 28 - Loop condition
In cases where the excel may have gaps in the columns, checking for the first empty column (figure 29) and skipping to the following line isn’t feasible. However, it does not impact the core functionality, as the skip is solely to hasten the process.
Figure 29 - Exit condition for empty columns
With this action implemented, importing the “Plus” package wields the following result (figures 30 and 31):

Figure 30 - Importing the “Plus” package
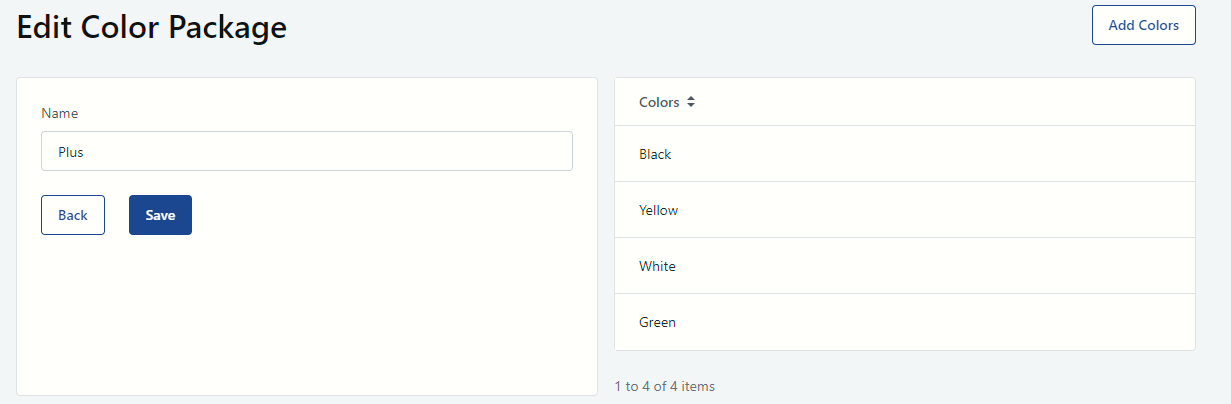
Figure 31 - Importing the “Plus” package
Examples of Export and Import methods in actual usage
In this scenario (Figure 32), an item with any number of properties is exported in the format of
[Item common fields, PropertyN Name, PropertyN Value]
Meaning that for every column's iteration, two columns have to be written, but the core principles are the same as in the example above.
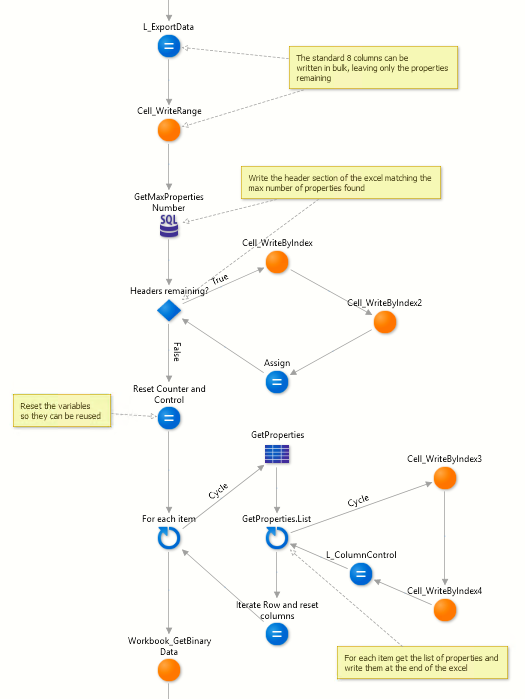
Figure 32 - Example of exporting method in use
This import scenario (Figure 33) is somewhat more complex due to the validations in place. However, the basic structure is the same, and the Common fields are read at the start and checked. If all are empty, it signals an empty row. After validations, the properties are checked.
In this case, like above, two checks occur per row. The records are only committed at the end of the loop in case some critical validations fail. This particular process is tailored to the business needs as it also includes a secondary export of a document containing all the failed rows and the reason for failure.
This is an example of the adaptive capabilities of this component and this method of importing.
Figure 33 - Example of import method in use
In summary
This approach can offer great control and flexibility to any less than standard export or import requirements. While this document shows a simple scenario, the examples above show just how tailored this process can become. Its trade-off is naturally the higher effort to implement. Building a solid base and understanding of the component allows for robust validations and business requirements to be built on top, as the import above showcases. While this guide focuses on handling data-dependent documents, it’s easy to see how much more this component can do.
It’s important to note that the Advanced Excel forge component has written documentation on its page, which can help alleviate some questions. As this is a popular tool, there is also a healthy forum presence and knowledge base.
Like this article? Share it:


