
Top 14 things we wish we knew before starting a data migration in OutSystems

A data migration might be a long and painful process, and if you are here, it’s probably because you’re one of the lucky few that will have a taste. So, you have come to the right place; we are here to help!
Earlier this year, we had to do a Data Migration, and now we have decided to gather the main lessons and cool tricks learned to write this super cool article. This data migration was achieved using an external tool available in the OutSystems Forge. However, we will focus on lessons that can be applied to any tool you might use.
This article will start with the most crucial question, “Why?”. There are many valid reasons for data migration, and we’ll cover a few.
After that, we are going to cover the different migration types. Depending on the goal you are trying to accomplish, you’ll have different kinds of migrations.
And last but not least, the top 14 things we wish we knew before starting a data migration.
Hang on tight, and enjoy the ride!
Goals
So, why a migration? Why hit the road to another destination, you ask? Because sometimes life gives you lemons, and... you just need a different fruit.
But kidding aside, why do we do these amazing and stress-free things called migrations?
There are a few reasons, and it all depends on what you are looking for, so let’s explore a few reasons or goals, to migrate.
One of the big ones is to have better data quality in a non-production environment to be able to test with more realistic scenarios. With better data, testers and developers will be able to test new features properly, replicate bugs easier, and consider more realistic performance metrics early on in the deployment lifecycle.
Another reason that nowadays is on the rise is to change from an On-Premises environment to the OutSystems cloud, which usually includes data and all the application’s code. There are also migrations to create data backups or just to import data from other systems to the existing database.
There could be other reasons to migrate, but the base is always to move application data from one place to another. No matter what or how the migration will be, it already requires some general considerations, and some of those are what we will try to share in the following sections.
Migration Types
All migrations are different. Depending on your goals, you will have to consider the following:
Environment and factory
Based on your environment and factory characteristics, some adjustments may be needed to the migration plan. Here are some possible migration scenarios to consider:
Between environments in the same factory
From a production environment to a non-production environment (PRD to UAT)
Between non-production environments (UAT / DEV)
Between environments in different factories
From an on-premises installation to the “OutSystems” cloud
Between OutSystems cloud environments
Between on-premises installations
Migration content
Within OutSystems you can have data in two major different entity types. These also need some considerations within data migrations. Below are some examples to consider. In the following sections, we will detail a bit more.
System entities
User entities (User, User role, User effective role, role, User group)
BPT entities (Process and Activities)
Application custom entities - entities created by the developers, these do not include static entities since these are created when the code is deployed
Data migration scale
The intended data to be migrated has a major role in migration planning because it can make or break your migration. Data dependencies are always there, waiting for the perfect moment to give an uppercut on your stress levels. Below are some possible scenarios, and we'll discuss them in the following sections.
Full database migration
Migrate all records from all entities.
Partial database migration
Migrate all the entities, but only some of its records
Migrate only some of the entities with all their information
A mix of above
Our Top 14 tips
So, you want to become a data migration expert? You came to the right article. Here are 14 tips to jumpstart your journey.
#1 – Get to know the beast! Preparation is key
First things first, get to know the database you will be working on. It is definitely worth taking some time to understand the business and database structure. Even if some team had already figured the whole thing out, do not be just a “clicking hand.” It is always essential to know the sand we are walking on, and also, a new perspective can make a difference. So, if you are not familiar with the database you will be migrating, a good approach could be:
Meet with the business team to understand the high-level relationships between concepts.
Use OutSystems system tables to confirm or better understand dependencies and data. Some examples are:
OSSYS_APLICATION
OSSYS_ESPACE
OSSYS_ENTITY
OSSYS_ESPACE_ENTITY
OSSYS_ENTITY_ATTR
Re-group with business to deepen your understanding and clarify any questions.
Iterate this as many times as needed (within the available time frame, of course) before the due day. It could be an immense pain to rearrange or re-do a migration because some entities or relationships were stepped over.
When breaking down a complex concept or task, some readers may still feel overwhelmed and unsure of their ability to understand it. Break down a few best practices on approaching the concepts and a few reminders about them.
#2 – Better safe than sorry
As we said earlier, it is crucial to know the database, at least on a high level. Still, in some situations, you can never be too careful and it is definitely handy to have someone knowing the hidden corners of the database because no detail is small enough to be left out. So here, we will dive a bit more into detail about some migration scenarios we presented previously, and considerations.
When migrating all records from all database entities, we may be less prone to have data inconsistencies, as all the information is being migrated. However, the order in which data is moved is critical because of its dependencies.
When only partially migrating the database, it gets trickier, so let's analyze some examples:
Migrate all the entities but only some of their records - When looking at the entities individually, this seems a pretty simple task as some filters will do the job. Yet, the database works as a whole, so dependencies need to be accounted for. Not migrating some records from an entity may require other entity records also not to be migrated, or data inconsistencies may occur.
Migrate only some of the entities with all their information - Again, entity relationships need to be carefully analyzed to prevent any data inconsistencies.
A mix of the above - The sky is the limit when in the “ask phase,” so let your imagination run wild there. Then come back down and think hard on what needs to be considered.
Even though the above considerations may by themselves present some planning challenges, they were made with the assumption that your architecture is spot on (as usually they are), so do not forget to look for indirect or even cyclic dependencies. These could require some back and forth in the migration process as some data may need to be updated later in the process as more entities are migrated, and relationships need to be kept.
So, if the tool you are using takes care of this, awesome, you just got some delay on those grey hairs, but make sure you discuss this with the tool support to understand its capabilities and if it fits your needs. If not, you need to consider the above in the migration planning/design.
In summary, do not take shortcuts in this phase. If this step is underestimated, it could lead to some costs later in the migration.
#3 – Keep track of your data
Consider adding attributes. One of the most important tips we have to offer is to add attributes to the entities to be migrated. These attributes should identify which records were migrated and, if possible, the original record in the source environment.
Original ID
As you probably already know, the same record might have different Ids in different environments. Therefore, it is crucial saving the original Id in the target environment.
This will be handy in the future to compare records between the source and target environments to make sure everything was migrated correctly. That way, you can differentiate the records that were migrated from the ones that were not, and you can also build scripts to read/manipulate the records whose Original ID is not NULL (migrated ones) or the other way around.
IsMigrated
If the option above is not possible (due to database space, for instance), the second-best thing is to have a flag set to True for the migrated records (booleans take less space than Long Integers). Unlike the first option, we won’t be able to map the records between Source and Target environments. Still, we’ll be able to identify the records migrated, which will be handy in our delete script (more about that later).
MigrationDate
Another attribute to consider adding is the MigrationDate. In a phased migration, it could be essential to know which migration batch each record belonged to (for example, if a batch goes wrong, you can work only that data and not redo the whole migration). And even if you are planning a one-time migration, things don't always go as planned, and it might be good to have a timeline to know when the records were migrated.
Implementing one or more of these options will add more steps to your strategy and implementation. However, the time you invest will have its return down the road since this will allow you to:
Map the records between Source and Target environment (first option).
Differentiate the records migrated from those existing before the migration (All options).
Help you have a historical view of the migrated data or measure the progress of the migrations by counting the records on the Source environment against the records already migrated in the Target environment by date (third option).
#4 – Obfuscation Options
When migrating, for example, from a Production to a non-Production environment, for better data quality in the dev or test environment, the migration might cause the non-production environment to behave as if it was Production (if you have URLs stored in the database). Keep also in mind that Production has sensitive information (User information). Thus you need to identify which fields have sensitive data.
Discovering which tables will be migrated and which are the sensitive fields should be a teamwork effort because the business knows better than anyone the tables required and which fields they want to obfuscate. For instance, the user’s mobile phone or email shouldn’t be shown in non-production environments.
Some data migration tools already offer this functionality by deleting or anonymizing it in the target environment, i.e., showing a random string instead of the actual data or even scrambling it. As you can guess, this last option will mix all data so that the field will keep the semantic value (a phone number will remain a phone number, a name will remain a name), but without the actual values. Take this example below:
| Original Name | After Scramble |
|---|---|
| Harvey Specter | Harvey Pearson |
| Jessica Pearson | Jessica Specter |
So, it’s a matter of knowing your data model, analyzing the fields that have sensitive data, and choosing how to obfuscate your data.
#5 – Lookup tables
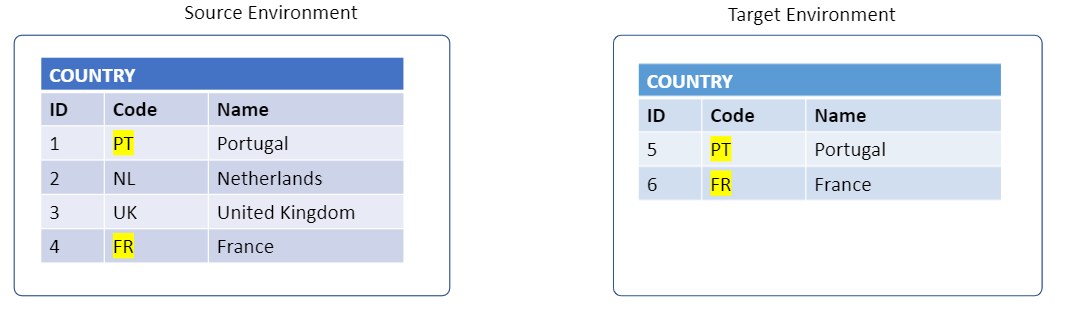
A lookup table is an entity that acts as a static entity, but for some reason, it's actually a regular entity. It usually has a unique attribute that acts as a code, and its information is the same in all the environments. For example, consider the migration of the entity of countries with just Id, country code, and name.
When migrating this entity, it is probable that the target environment already has records, so you don't want to create all the source records in the target environment, as you would end up with repeated records. But then, how do you know which to migrate?
If it is the same entity, just compare Ids, and it is solved! Not quite, mate. As you know, the Ids are not the same between environments, so that option, as tempting as it could be, will not do the trick.
Remember the Code we spoke about a few lines ago? That's it! Some tools offer a mapping functionality to choose a unique field, such as the Code. Then that field will act as a primary key, meaning that if there is a record in both the source and target environments with that code, it won't create another record, but some tools do update in these cases, so check to see if that could be an issue.

Another scenario is when you want to migrate an entity with a foreign key to a lookup table. In the above example, it could be the entity CITY. Again, it is possible to use the field Code in COUNTRY to map the correct information and ensure you don't end up with repeated records.
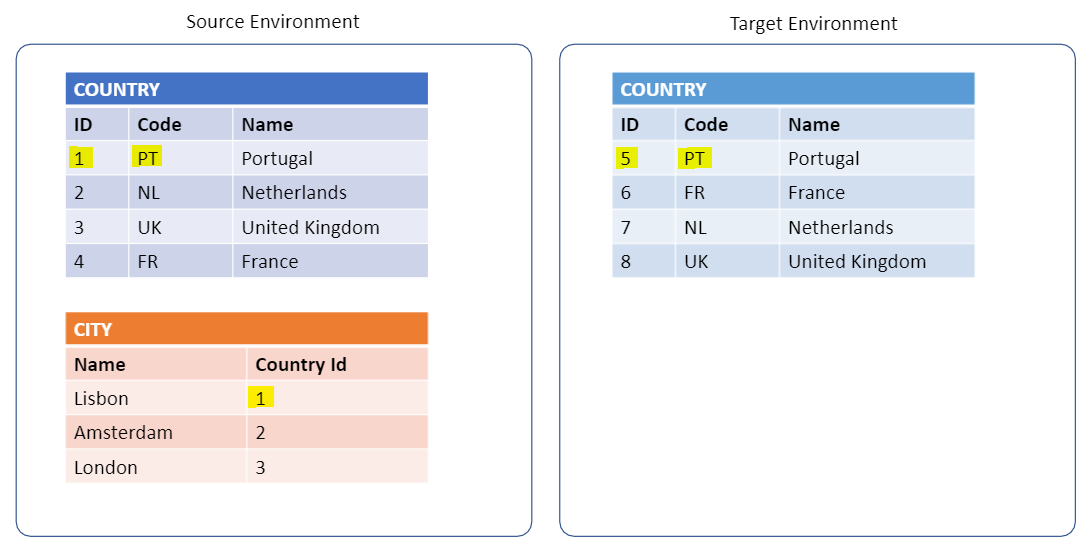
In this case, the first CITY record, Lisbon, will check the Country Id in the source environment Entity COUNTRY, which is 1. The country code PT will, in turn, be used in the target environment to check the COUNTRY Id, which is 5, and will assign it to the foreign key.
If, for instance, the record with the PT code didn't exist in the target Environment, the record would be created, and the generated Id would be used as the foreign key.

And there we have it, some brand new city records to use in the target environment without creating COUNTRY records that already existed.
#6 – Don’t forget the system tables
Some system tables need to be migrated to maintain the correct behavior of the application. If your application uses BPT, the BPT tables would, ideally, also be migrated. If you have foreign keys to the Users, User role, and user group tables (who doesn't?), those also need to be migrated.
Some tools do that automatically; others only migrate the BPT in premium versions. So this is a critical point to consider before choosing the tool and the version or building a tailor-made tool.
Suppose you are migrating with your own code. In that case, some special attention is needed to hybrid system entities (for example, the already mentioned users and BTP tables) since, contrary to system entities, the hybrid ones allow the app to write information on them and the migration itself will also need to do it.
#7 – Check the database space
This could seem a bit of an "everyone knows that" kind of tip, but it could kick you Chuck Norris's style if you do not prepare for it. One critical step is to validate the amount of data you will be migrating and account for all the extra data, temporary or not, that comes with the migration process.
This extra data could be, as we mentioned above, additional attributes, or entities, used to keep track of what and when was migrated or even mapping entities.
Some migration tools use mapping entities that store temporary data. In some cases, this could be as much data as the one migrated (for example, a migration of 10Gb could generate 10Gb of temporary data, thus requiring a 20Gb space at some point in time). So, validate with the tool support to understand the space usage you will need. This could mean upgrading necessities for your database or a redesign of your migration plan, so the sooner you get through this step, the better.
#8 – Plan for database backups
When migrating data, plan your database backups. It is essential to always have a way to restore the environment's data from a snapshot of the database taken immediately before the migration. This is especially important if you migrate data to an environment that already has data and do not want to delete or update the existing one. This way, you can restore the target's original data if needed.
If you have an on-premises installation, coordinate with your infrastructure team to schedule a database snapshot to be taken immediately before migrating while making sure that they have a plan for restoring the database backup if needed. If you have an OutSystems cloud installation, open a support ticket and confirm the possibility of restoring the database and taking a snapshot (non-production environments usually do not have restoration available).
#9 – Create a deletion script
Not to doubt your amazingness, but yes, you will use it…
The message here is that every code needs testing, so it is helpful to have something ready to clean bad data during testing or when everything is prepared for the real deal. Even when using existing migration tools, it is always important to do some testing to know its behavior and limitations. Within these tests, some data may need to be deleted.
So, even though the migration could run smoothly and without a hitch, in the early stages of the migration, during implementation (for a custom-made tool) or testing, it is advisable to have a way to keep everything clean and tidy.
#10 – Create scripts to keep track of your data
Even though we can have all the migrated data identified, mapped, and all of that, if you are, for example, migrating a whole database, it could be tricky to confirm if everything went as expected. So, one way to have a first glimpse of the data is to have some queries prepared. A few examples could be:
A query to count the migrated data by entity (for example, the number of flagged records)
A query to count the total records by entity
With this type of feedback, you have quick access to a migration overview (even during the migration) and can catch any unexpected issues. It could also help to compare the number of records in the environments before and after the migrations to see if any are missing. When using the deletion script, control deletions could also benefit from these queries.
Using the above control techniques allows you to have a good data triage during and after the migration. Then, if everything looks sharp, you can go deeper into some app testing to better validate data or even look for specific data that might need a more detailed inspection.
#11 – Do a dry run
It’s imperative to know your tool and be comfortable using it. So, before doing the real thing, we recommend running some trials in the dev environment. This will help you get familiar with the tool, give you a preview of what the data will look like, and probably uncover some errors or issues that were not thought out at first.
So, test the migration goals you have set in small chunks of data, for example:
Migrate information from two entities when one depends on another
Migrate some information from system tables
Migrate mapped entities (with the “code” attribute we spoke about earlier)
Next, you can also test some control queries and monitor the server behavior to extrapolate some predictions for the actual migration (even though it is not always a linear process, it can help get a ballpark).
#12 – Choose an off-peak time to pull the trigger
This one is especially relevant if you are migrating large amounts of data. When migrating data from one environment to another, the system will need to allocate resources to these tasks both on target and source environments. Hence, choose an off-peak time to migrate the data. This way, you will not overwhelm the system with end-user requests and requests related to data migration.
#13 – Disable the application
Ideally, it is preferable to migrate data with the application disabled. This way, data cannot be created, updated, or deleted by end-users when migrating it.
If this is not possible, you can still migrate data, but you might have some data inconsistencies, and depending on the tool, it could throw some migration errors.
Validating this with the client is critical. If a migration is required during application usage, the migration might generate data inconsistencies due to records being created, updated, or deleted while the migration is running. Check how the tool deals with these scenarios and manage expectations with the client.
#14 – Monitor your migration. Expect the unexpected!
Monitoring is paramount if you are migrating a large amount of data and the system is critical. The migration can overwhelm the system, and you might have to restart it. Make sure you have a contingency plan for this scenario coordinated with your infrastructure team so that in case this happens, you know what to do. If your system is in an OutSystems cloud environment, guarantee you have support.
A good way of monitoring the migrations is to have it write logs along the process. This way, you can know exactly where the process is, and in case of errors, you can debug them faster. Some tools already provide real-time logging within some application screens, but you can always use service center logs.
Final Considerations
Even though this seems a lot to consider, let us ease you with the following: This is not even the tip of the iceberg. But do not tumble! It is not you; it's them. Migrations are by themselves a world of cases and headache opportunities. So just keep calm, do the homework, and when the ball comes, just hit it hard, homerun style!
Also, an important note, this article is not meant to be a recipe or a "quick guide to...", but just a friendly help with some knowledge we gathered through experience and trial and error.
So, we hope you have enjoyed it and learned from it, and also thank you for your time.
Further Reading
Before the goodbyes, here is some useful documentation if you want to dive a bit more into it:
Introduction_to_Data_Migration
Data_Migration_From_Production_to_Non-Production_Environment
Migrate an Environment Using a Database Clone
Now go...migrate away and do not look back.
Like this article? Share it:


