
How to deal with URL parameters: to hide, or to validate, that is the question

Have you ever asked yourself or a colleague, “how can I hide URLs input values in OutSystems Apps?” or “how can I keep URL parameters and still have a secure app?”
There are several reasons for OutSystems developers, like you and me, to ask these questions: maybe we are concerned with the application’s security or want to change the URL for aesthetic purposes. Like us, many others have had this same issue. Don’t believe me? Just go through forum threads; they’re loaded with questions like these or similar ones.
So, if you are struggling with this while looking for solutions so you can choose the best for your situation, today is your lucky day!
Since there are multiple answers, with pros and cons (as expected), I bring you a compilation of suggestions, tips and tricks, and also some forge components. These will help you achieve the next level of URL security (or have the best-looking URL, if that is what you wish).
Although this article has examples and case studies to make it as straightforward as possible, it is highly recommended you know your way around the OutSystems platform to fully grasp some of the concepts.
Ready? Let’s get started!
URL parameters: one BIG concern
Imagine developing an application to list all your favorite songs with their respective albums and artists’ information. Additionally, you will want to create and update records and the possibility to open a record from the list.

As you can see on the image above, there is a link on the ‘Title’ column to allow the user to navigate to the details screen of the selected record.
Typically, your app will:

on the Detail screen:
have an input parameter with the record identifier;
use the screen input to filter the form's source query (aggregate or SQL) to get the respective record;
on the List screen:
set the link method to navigate;
set the destination to the desired screen;
assign the record's identifier to the link input parameter.
This method will result in having the screen inputs exposed in your URL and, if no security measures are taken, in a “small playground” for users that know how to use inputs to navigate through apps.

Although security might not be your biggest concern when developing an application, you should pay attention to what kind of information you choose to expose in your URL.
Don't forget that users don't always behave like you want them to, and some of them know how to use tools that can bring security problems.
Moreover, if you use these inputs in aggregates or advanced queries, you should definitely be thinking about security. Aggregates are usually safer, but if you are using SQL queries, keep in mind that they are more prone to code injections.
There are multiple approaches, like validating the parameters, using other types of variables, changing the navigation method… There is something for everyone!
I'm here to help, so let's continue with the favorite songs application and see how we can implement some of these methods. This application is a straightforward example for demonstration purposes, but you can apply this logic to multiple input parameters if needed.
First things first: Roles
As an OutSystems developer, you should know that the platform has role-based access control, and you can restrict screens and actions depending on specific application roles.
One way to have a safer application is to only allow anonymous users in the ‘Login’ screen and have this role unchecked in all the other screens.
You should also create specific roles for your application, only allow users to access screens if they have the right roles, and validate, server-side, if they have permission to view specific data or perform certain actions.
If you are working with reactive applications, you may want to try one of the OutSystems Javascript API’s functionalities: checking a role client-side. If you want to know how to take advantage of this feature, look at our colleague Fabrício Bonifácio’s article: OutSystems Javascript API: Security and Logger.
Keeping parameters in the URL
As developers, we sometimes need to follow application patterns and rules given by the client, and one of them can be to keep the parameters in the URL. It can be because it will allow users to navigate quickly through the app if they know how to, or because the application will rely on logic to validate the values.
If this is your case, here are some tips you can follow:
Case Study I - SEO Rules
SEO – Search Engine optimization – rules refer to best practices to improve applications’ organic traffic and ranking on search engines. In this case, we are interested in a specific part of this process: “on-page SEO basics for URLs.”
These rules help you mask the parameters’ values and make your URL more friendly, giving it more relevance for users (and search engines).
If you want to implement this in your application, you are lucky because OutSystems has your back!
You can access the ‘SEO URLs’ option under the ‘Administration’ tab in Service Center and set the desired configurations to define the rules that will handle and transform URLs in the platform. When you use these configurations, OutSystems optimizes the destination URL and changes it to the best path that takes the most of your SEO configurations when clicking on a link and at runtime.
You should know that this feature is in a ‘technical preview’ state for reactive web apps and requires some specifications, as you can read here.
If you’re developing a traditional web app, learn more about this implementation here.
Case Study II - Validate Parameters
If you want or need to keep the parameters in your URLs and still avoid issues originating from changes in the URL, you can create logic to validate them. You should consider the requirements of the screen you are developing, how many input parameters are needed, if the value can be null, etc.
If we go back to the example application, we can ask some questions to help us determine what needs to be validated:
Do we need one or more input parameters?
Can the parameter(s) have null value?
What happens if the value is null?
What happens if the value is invalid?
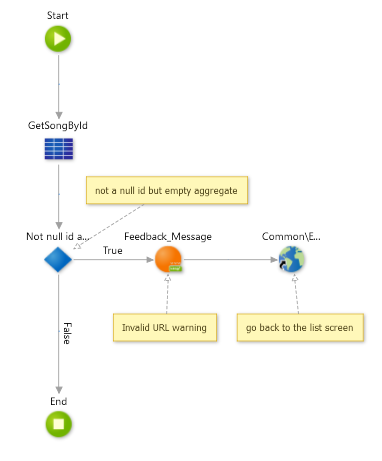
With these questions in mind, let’s go to the Service Studio and see what we can do:
We have a Detail screen with the songs form that needs one input parameter: the song identifier;
Since it’s a form to create or update a record, it can receive a null identifier parameter (creation scenario);
If the parameter is not null, you will need to validate if the record exists;
In case the corresponding record doesn’t exist, it means that your URL was tampered with, and you will need to decide what happens next: for example, you can send the user back to the list screen with a feedback message saying that the URL is not valid.
This application is a straightforward example with just one input to validate. However, if you have more than one in a junction table, you will probably want to validate if there’s a match between your input parameters.
Suppose you are developing a traditional web app. In that case, this is an easy logic to have on your screen’s preparation, but if your application is in reactive web, you will probably need a data action to implement this, and you probably don’t want to do it.
Hiding URL input values
One way to deal with this matter is simply hiding the URL's input values.
If you don't have mandatory app patterns and don't need to keep the screen inputs on your URL, here are some suggestions of what you can do, but be careful of what you wish for.
Case Study I - Session/Client Variables
As you know, when working with OutSystems Service Studio, you have access to ‘session \variables’ or ‘client variables,’ depending on whether it’s a traditional web app or a reactive one.
These variables are helpful in many different ways and have their pros and cons:
Session variables store data server-side in a key-value format and are cleared when users log out of the app or close all the browser windows. These variables can have many data types, but avoid using them for compound data types when performance is a concern.
Client variables store data client-side in a key-value format and only use basic data types with binary data as an exception. These variables reset to their default values when the user signs out of the app or when the platform signs out the user automatically.
“But how would this help me?” you may ask. And the answer is: session/client variables don’t appear on the screens’ URLs. Let’s continue with the test case application, and I’ll show you:
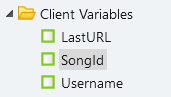

If your application is a reactive web one, first you need to create a client variable to store the information you need to send to the other screen; for this case study, a ‘SongId’ session variable was created, with long integer data type;
Next, use the client variable as a filter on the source aggregate (or SQL query) of your form, and delete the input parameter of the detail screen;
Going back to the list screen, you need to create an action to assign the wanted value to the client variable; in this case, the client action ‘NavigateToForm’ was created with ‘P_SongsId’ as input parameter;
Inside this action, you should assign the input value to the client variable and use an External URL to navigate to the destination screen; you can use a screen as the destination instead of an External URL, but this way, you will have your URL updated to the screen you are being redirected to;
The only thing that’s left is to, on the list, set the link ‘On Click’ event to the created client action and assign the current record value to the action’s input parameter.
After applying these changes to your code, you can test it out, and you will see that the parameter will no longer appear on your URL. So, when navigating to the detail screen, the URL changes to:

If you are working on a traditional web application, you can replicate these steps using session variables instead of client variables. You will need to set your list link method to ‘Submit’ before assigning the screen action to it.
Although this might seem a perfect answer to all your problems, you need to know that this approach has a downside: the user won’t be able to work using multiple tabs. Since we are using a submit method, we don’t have access to the ‘open in another tab’ feature.
And you may say, “but I can use JavaScript to click a link outside the scope of the screen action, set a target blank, and it will open in another tab.” And you are right, but it won’t work as you expect. Since you store the needed parameters in session variables, they will be different every time the user clicks on a link to navigate. So, although the user can open multiple song records in separate tabs, it will not be possible to update multiple records simultaneously since the session variable holds the value of the last clicked link.
This approach can have its pros, but this is definitely a con you must consider.
Case Study II - Submit Method
Another way to remove parameters from URLs is to use a link with a ‘Submit’ method instead of ‘Navigate’. In the previous example, we used the ‘Submit’ method associated with a session variable, which also works with a standard input parameter.
Using a ‘Submit’ method will generate an HTTP POST request instead of a GET request, and the input parameter will be passed as a POST parameter and not in the URL, so it will no longer be in plain sight to be tampered with. You will just have to:

For traditional web apps, add an input parameter to the detail screen, and use it to filter the source aggregate (or SQL query) of your form; continuing with the example application, a ‘P_SongsId’ was added to the detail screen so that the user can open the desired record;
On the list screen, you need to create an action to redirect the user to, in this case, the detail screen; you can rework the previous screen action, ‘NavigateToForm’, and keep the input parameter;
Inside this action, the only thing you need to do is to set the destination screen and assign the respective input parameter; in this case, you can’t use the External URL since it will turn into a GET request;
The only thing that’s left is to, on the list, set the link method to ‘Submit’, the destination to the screen action, and assign the current record value to the action’s input parameter.
If your application is in reactive web, the logic is the same, but you assign your client action, on the list screen, to the ‘OnClick’ event of the link, just like in the previous example.
Beautiful, isn’t it? Such a great idea! Or is it …
There’s another side of the coin: as explained above, using the ‘Submit’ method will remove the ability to work using multiple tabs, but that we already knew. In this case, since we need to use a screen destination, it will also keep the URL equal to the screen where the user clicked on the link (following this example, the list screen).

Another detail that can be an issue is that a user that knows how to use the browser’s Developer Tools can still tamper with the values. Through these tools, it’s possible to reach the POST request and change the input parameter value. It’s also possible to bookmark the page and share the URL to view the record.
So, keep these details in mind before choosing this way of hiding URL parameters.
Case Study III - JavaScript
If you are a JavaScript Jedi master or a young Padawan learning how to use the Force, you may want to try and use some JavaScript to remove the URL parameters.
It’s pretty straightforward: just add this piece of code to your application:
var uri = window.location.toString();
if (uri.indexOf("?") > 0) {
    var clean_uri = uri.substring(0, uri.indexOf("?"));
    window.history.replaceState({}, document.title, clean_uri);
}
(this code was found while navigating through forums, CTTO)
For reactive web applications or mobile ones, you will need to add this to the ‘On Initialize’ event of the screen you want, using a JavaScript element.
When developing a traditional web app, this JS can go to the JavaScript part of the screen, flow, or module, depending on your end goal.
It’s as simple as that!
Using this technique will allow you to keep your screen’s input parameters and the ‘Navigate’ method on your links.
Just don’t forget that, for traditional web apps, the JS code is placed in a separate file included in each HTML page generated at runtime.
Case Study IV - GUID
GUID, or Globally Unique IDentifier, is a pseudo-random 128-bit number that can be used as an identifier.
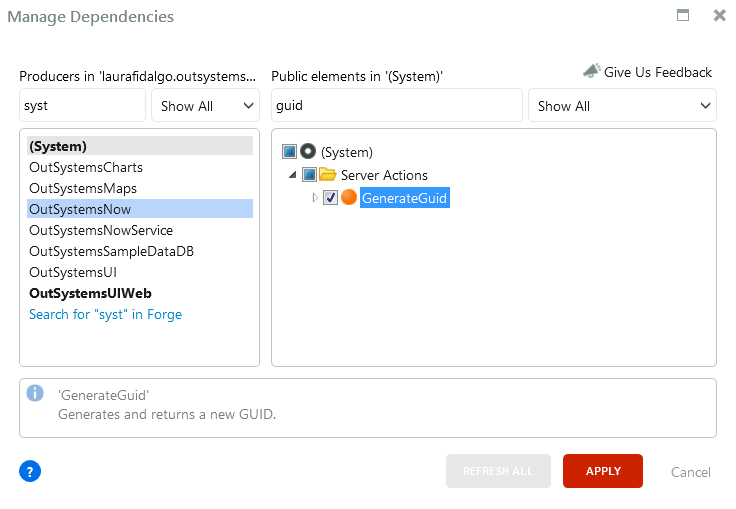
If you don’t mind having a train of characters in your URL and adding another attribute to your entity, you can use the GUID logic. Luckily for us, OutSystems provides a function called ‘GenerateGuid’. As you can see in the image below, it can be found under ‘(System)’. This function does basically what the name states: generates a GUID and returns it as an output. You just need to add it to your logic flows.
Continuing with the example app, we simply need to follow a few steps:
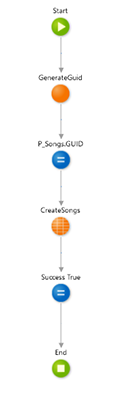
Add a new attribute to the entity, a GUID field to the Songs table in this case;
Add the ‘GenerateGuid’ function to your logic flow; this function can be included, for example, inside the create record wrapper, since this should be created along with the record and should not be updated;
Then, on the UI side, you should set the screen input parameter to be your GUID, instead of the record’s identifier, and use this new attribute to filter your form’s source query;
On your list screen, you can set the link’s method to navigate and assign the GUID from your current record to the destination screen input parameter.
As you can see, it’s a simple approach that can give you an extra layer of security, and this works for traditional web, reactive and mobile apps. Your URL may not be the best-looking one and can become quite crowded, but at least it’s not as inviting to be messed with as a simple identifier input.
So, when navigating to the screen that has the GUID input parameter, the result will be something like this:

You can always pair this method with SEO rules or other workarounds that can remove the name of the screen’s input parameter to have only the GUID’s value in your URL.
Keep in mind that if you want to use this, you should create an index for your GUID attribute since you will be using it as a filter in your queries.
Also, don’t forget that this method doesn’t prevent the user from copying the URL and giving it to another user without permission, so it’s crucial to work with roles.
Case Study V - Encrypt/Decrypt Forge Components
Another way to remove your input parameters from the URL is to encrypt them.
The general idea is to encrypt the parameters before navigating, when the URL is generated, and decrypt while entering the target screen. One of the significant concerns is to have a compatible structure on the target screen, to be able to decrypt the parameters and map them to the needed variables and logic.
If you don’t want to spend time creating customized logic for that, you can go to the OutSystems Forge and look at what other fellow developers have created.
To make your life easier, here are some suggestions:
CryptoAPI: a component that gives you a set of server actions for encrypting/decrypting information, with two encryption features: randomized encryption and deterministic encryption.
Randomized encryption, or probabilistic encryption, is a procedure that uses randomness in an algorithm to encrypt the desired message (parameters in this specific case) and is typically used when using public-key encryption algorithms. On the contrary, deterministic encryption is a system that produces the same ciphertext for a given plaintext and key, even over separate algorithm executions.
According to the documentation: “both of them provide authenticated encryption, meaning they'll let you know if the ciphertext has been tampered with.”
CryptoToken: supplies three functions and is “ideal for use in IDs in screen transitions.” This component gives you the ability to encrypt a text or a list using one function and, for the decryption, offers you two options: one to decrypt a text and the other in case you have a list.
This component has the CryptoAPI as its dependency since it uses some of the CryptoAPI functions to encrypt and decrypt the parameters. In a way, CryptoToken works as a wrapper for the CryptoAPI, simplifying its usage but limited to randomized authenticated encryption.
JWT: a “library for creating, decoding and validating JSON Web Tokens.”
JWT provides a set of actions to handle JSON Web Tokens (learn more here) meant to handle different cryptographic algorithms and key formats.
This component supports symmetric algorithms, using the same key to encrypt and decrypt the data, and asymmetric algorithms using a secret (private) key and a shared (public) key.
Thanks!
Thank you for reading this article!
I hope you enjoyed this journey through these tips and tricks for URLs, and I hope this article was able to make your life easier.
There’s no perfect approach, so don’t forget to weigh the pros and cons of each one and choose the best fit for your application. Maybe even a mix-and-match between some techniques.
I wish you good luck with your secure app developments!
Like this article? Share it:


