
Handling Null Values in OutSystems REST APIs: Practical Solutions and Best Practices

If you have worked with OutSystems for a while, you have certainly noticed that it does not support null values. In OutSystems, a variable's value will never be null; they will assume the default values for the corresponding data type, such as 0 (zero) for integers, “” for texts, false for booleans, and so on.
While OutSystems' automatic conversion of null values might seem convenient, it can lead to unexpected results when interacting with data from external systems that do support null values. Developers must be vigilant when using and comparing these values, as they may not align with their expectations.
Imagine a scenario where you need to integrate with a REST API that allows you to obtain a list of parameter values (let's assume that all parameter values are integers). In this case, a null value could indicate that the parameter has no value set. For example, there could be a parameter called Max Value, where the maximum value for an asset is defined, and a null value indicates that there is no max value defined. In practice, the parameter values can return a value if they are defined and null if they are not defined. OutSystems does not support this. Upon receiving the data, OutSystems will automatically convert the null values to the default value for an integer, in this case, 0 (zero), thus losing the possibility of distinguishing between Value = 0 and Value not defined.
While this issue can be abstracted to any JSON data, this article will focus on the particular case of exposing and consuming REST APIs in OutSystems with JSON requests/responses.
REST APIs: Receiving, Sending, and Managing Null Values
A REST (Representational State Transfer) API is a set of rules and conventions for building and interacting with web services using standard HTTP methods. It allows different systems to communicate by performing operations like fetching or modifying data, often represented in JSON or XML formats. REST APIs are stateless, promoting simplicity and scalability in integrating disparate systems.
With OutSystems, you have the power to integrate your applications with REST APIs provided by other systems or other OutSystems applications. This versatile functionality can be used to obtain data from those systems or to request that they perform some action, empowering you to extend the capabilities of your applications.
You can also expose REST APIs in your OutSystems applications. In this case, other systems can consume the API methods created under a REST API.
Suggested for You
In this article, we’ll explore what REST API Web Services are and why they are important. We will also explore why they are widely used on the OutSystems Platform, what precautions to take while using them, and some suggestions.
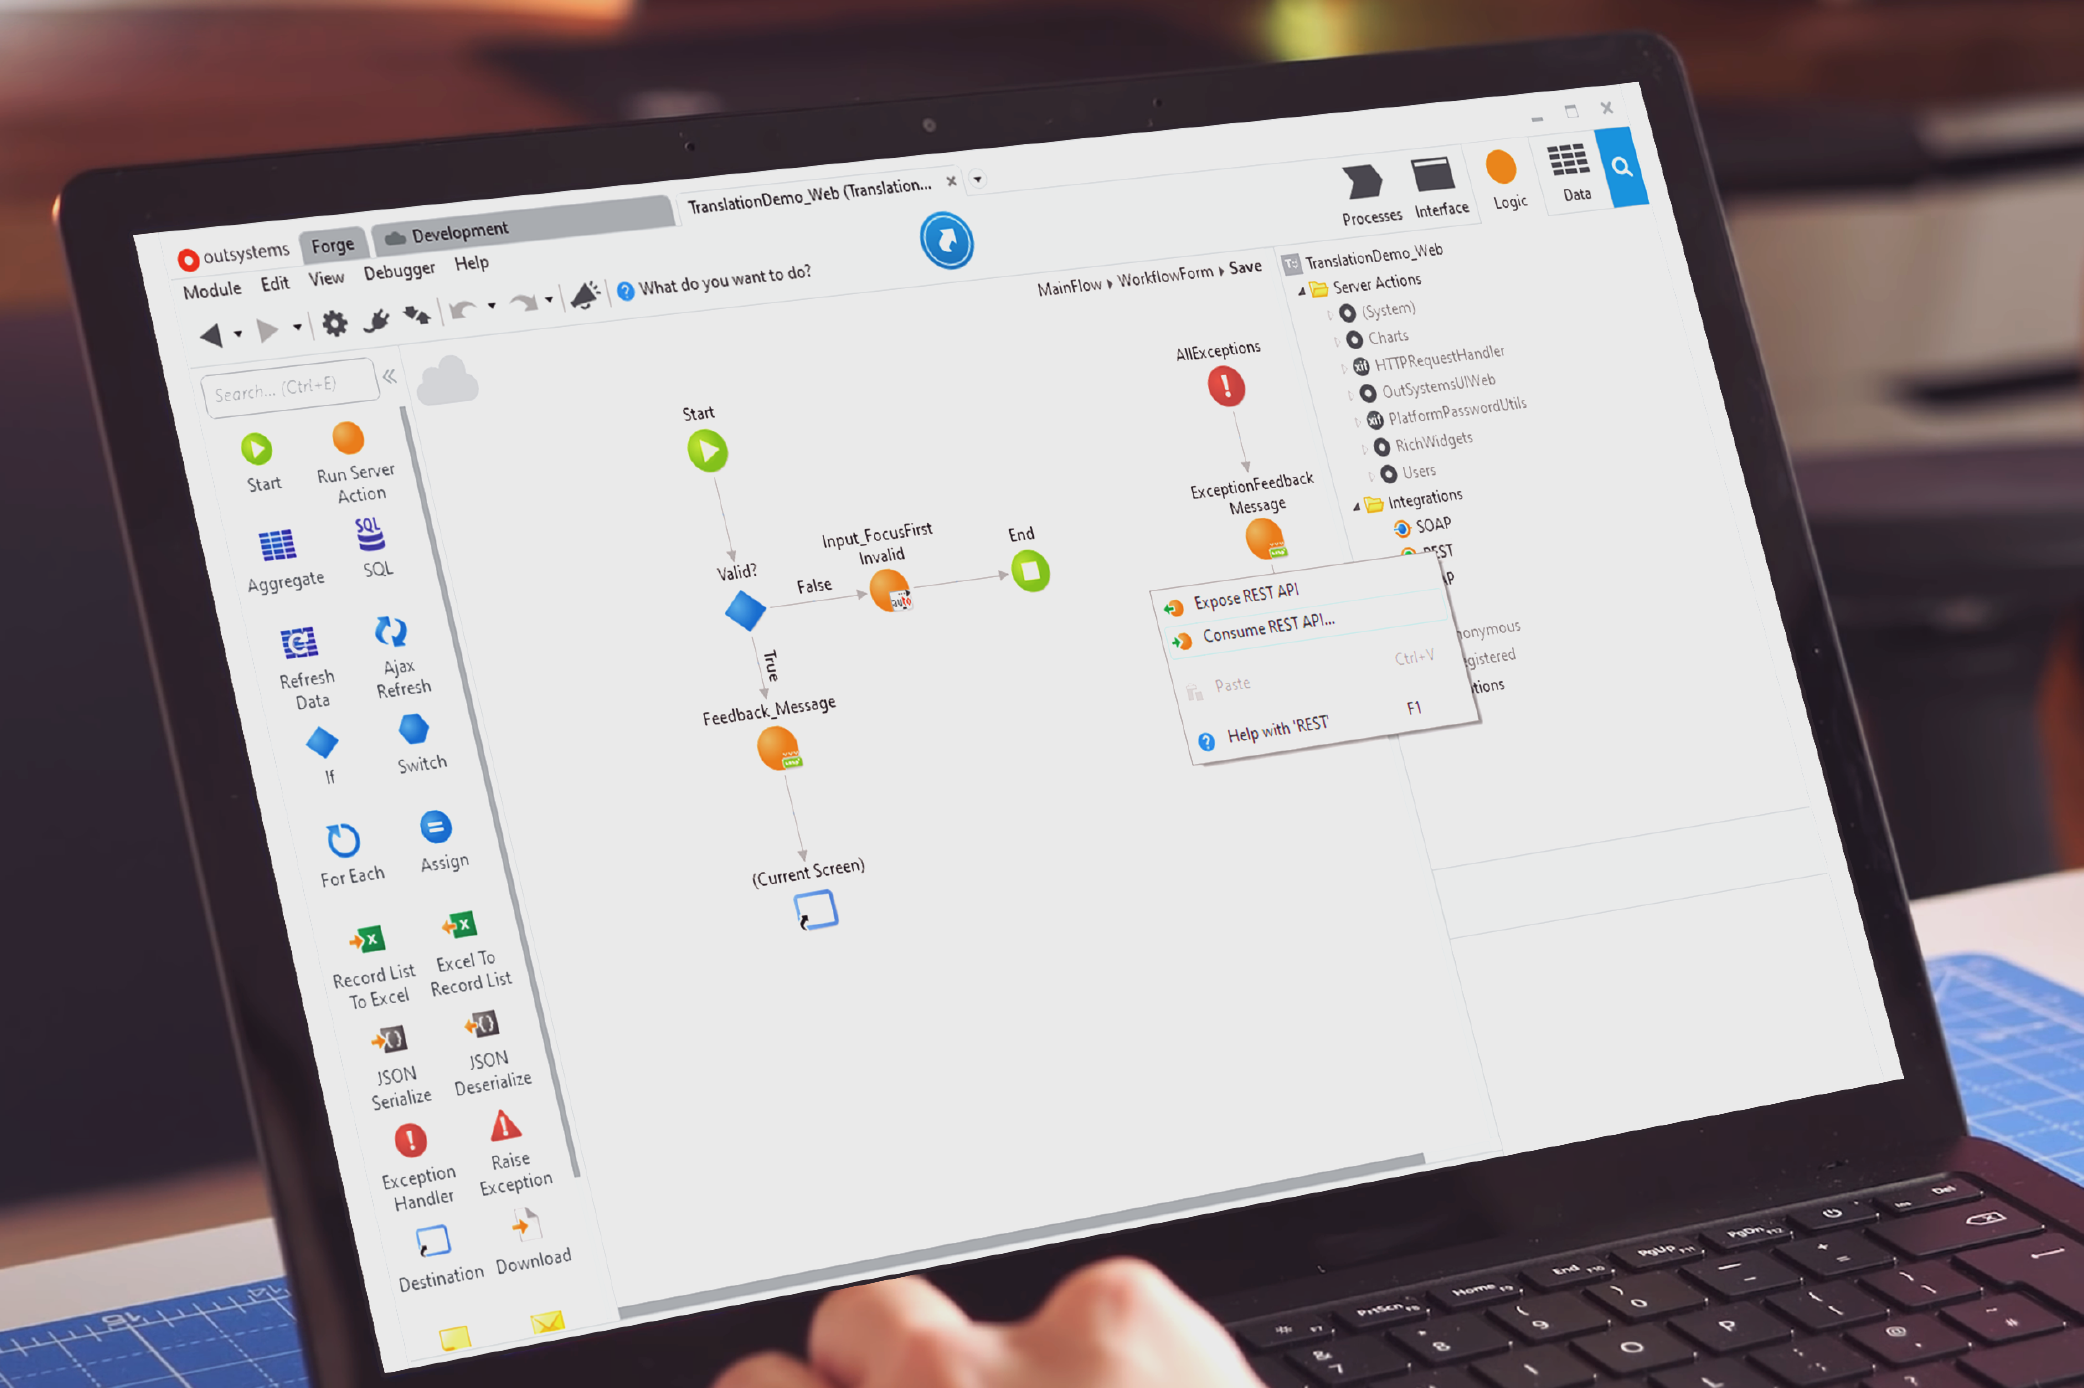
Receiving data
Data can be received into the OutSystems platform by either the response of a consumed REST API provided by another system or by the request made to a REST API exposed by the OutSystems platform.

Image 1 – Receiving Data
Following the previous example of a REST API to obtain the list of parameters and their respective values, we can obtain this data with the following GET request:
GET /Parameters?AssetId=123
Check image 2 for some possible responses.
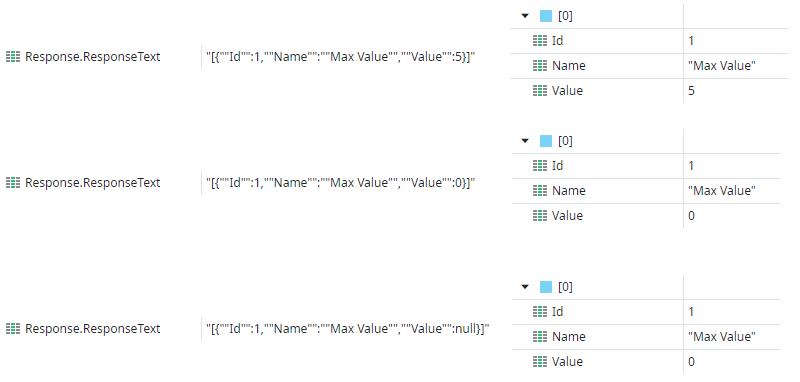
Image 2 – Possible Responses
By comparing the responses in Image 2 (obtained using the OnAfterResponse event) and the corresponding OutSystems variable values, it becomes clear that although the REST API returned null in the last example, the corresponding variable has the value zero. With this default behavior, there is no way to identify when the value field is not defined.
If we check the OutSystems documentation, we can find a suggested solution for this problem: setting Default Values that are highly unlikely to be sent in runtime for each attribute.
For example, we can use -999999999 for integer attributes.
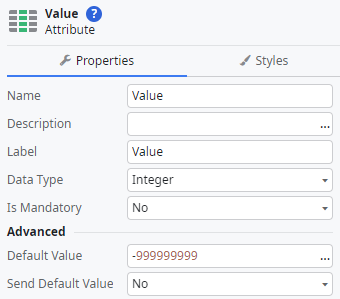
Image 3 – Set Default Value to -999999999
If we repeat the previous REST API call, upon receiving the data, OutSystems will automatically convert the null values to the attribute’s default value, in this case, -999999999.
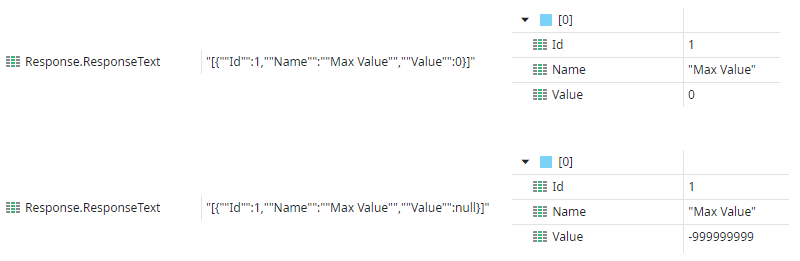
Image 4 – Repeating the REST API call will automatically convert the null values to the attribute’s default value
With this approach, it is now possible to distinguish between a value of zero and a value that is not defined.
Because this relies on changing the Default Value for each attribute, the choice of a new default value must be considered carefully. Although highly improbable, it is not impossible that the value chosen as the new default value will be used in runtime. Another potential drawback is the propagation of the new default value to other areas of code. Developers must always be aware of the default value for each attribute, for example, if they want to check if the field is not defined.
This was an example using the response of a consumed REST API; however, the same logic applies to a request made to a REST API exposed by the OutSystems platform.
Sending data
Data can be sent by the OutSystems platform in either the request made to a consumed REST API provided by another system or in the response of a REST API exposed by the OutSystems platform.

Image 5 – Sending Data
Continuing with the previous example, let's imagine the same REST API also allows the update of parameter values using the following POST request:
POST /Parameters?AssetId=123
Check image 6 for some possible requests.
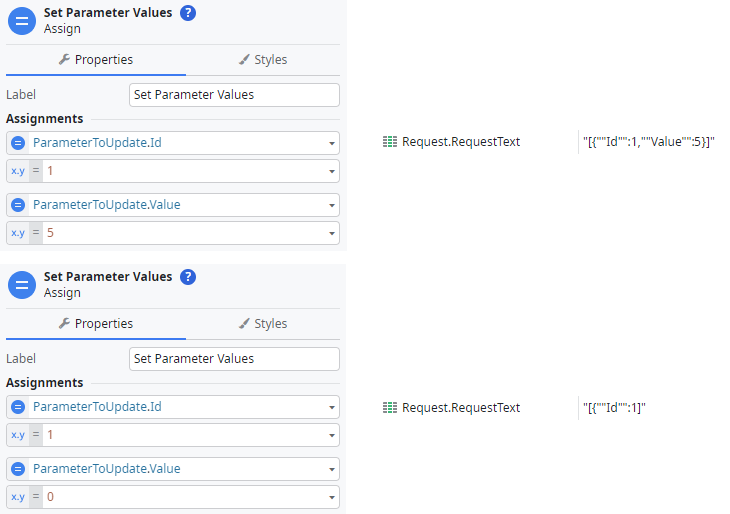
Image 6 – Some possible requests
As zero is the default value for integer attributes and the default behavior from the OutSystems platform is to not send the default values of attributes, this field is not included in the request. This behavior can be changed by changing the Send Default Value property of the attribute to Yes.

Image 7 – Changing the default behavior
If we repeat the previous REST API call, the request will now include the Value attribute, which is set to zero.

Image 8 – Value attribute included in the request with the value set to zero
As the Value attribute is an integer, there is no way to indicate that we want to send a null value (setting the attribute to NullIdentifier() will not work as, in this case, it would have the same result as setting it to zero).
This was an example using a request made to a consumed REST API provided by another system; however, the same logic applies to the response of a REST API exposed by the OutSystems platform.
PATCH method
While this problem can occur in any interaction with an external system, implementing PATCH methods in REST APIs is a particular scenario where it can cause issues or hinder development.
The PATCH method is a way of partially updating a resource without sending the whole representation of the resource. It is useful when you only want to change some attributes of the resource without affecting the others. For example, if you have a user entity with name, email, and password attributes, and you only want to change the email, you can use the patch method to send only the new email value instead of sending the name and password as well.
Due to the simplification and abstraction provided by OutSystems to accelerate development, there's a constraint in the PATCH semantics that may result in patterns that are not supported by OutSystems language, like null values. If you must ensure that your PATCH fully obeys the semantics, you must find a way to distinguish which attributes were indeed sent.
Using JSON Null Utils for Effective Null Value Management in OutSystems
The JSON Null Utils component (available to download on the OutSystems Forge) was created to provide a possible solution (or at least some alternatives) for handling null values in JSON data in OutSystems. This component’s basic strategy relies on creating an extra auxiliary boolean field for each attribute that indicates whether the attribute is null or not.

Image 9 – JSON Null Utils component
One way to get around the fact that OutSystems does not support null values is to decompose each value into two separate fields. One keeps track of whether the value is null, and the other one actually holds the value. This way, before using the value, we can use the extra field to check if the value is null. To simplify things, the name of the auxiliary boolean field will always be the original field’s name suffixed with _IsNull.
Receiving data
There are three possible configurations for handling incoming data. Depending on your needs, one might better suit your use case than the others.
The following examples are of a REST API provided by another system that is consumed by the OutSystems platform. However, the same results can be achieved when exposing a REST API in the OutSystems platform by applying the same logic to the requests of the exposed API.
Option 1 — Validation with JSONPath
The first configuration will initially parse the incoming data so that fields can later be validated when needed using a JSONPath expression.
- OnAfterResponse
Add the OnAfterResponse event to the consumed REST API. After the assign to set the CustomizedResponse, which is automatically added to the flow when the event action is created, add the JSON_IsNull_Init action (from the JSON Null Utils component) and set the JSON input to the ResponseText.
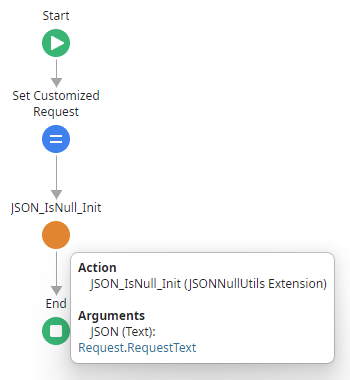
Image 10 – Add the OnAfterResponse event to the consumed REST API
The JSON_IsNull_Init action will parse the incoming response and store an internal object that will be used later to check if a particular field is null.
- Validate null value with JSONPath
To validate if a field is null, after calling a method from the consumed REST API, use the JSON_IsNull action (from the JSON Null Utils component), setting the Path input to the JSONPath expression corresponding to the field.
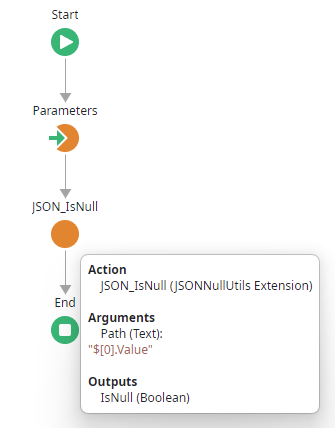
Image 11 – Use the JSON_IsNull action to validate if a field is null
The JSON_IsNull action checks whether the field provided in the Path input is null and returns a boolean output with the result.
- Results
By comparing the responses (obtained using the OnAfterResponse event) and the corresponding OutSystems variable values, we can see that, although the Value field has the value zero in both examples, the output returned from the JSON_IsNull action is False if the value was not null and True if it was.
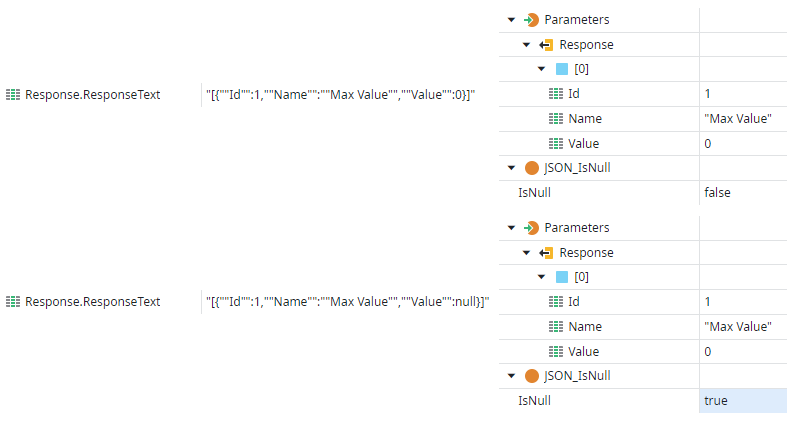
Image 12 – Comparing the responses obtained using the OnAfterResponse event
This approach allows developers to validate if a particular field’s value is null and use this to develop further logic. On the other hand, this approach means that JSONPath expressions must be hardcoded in the application’s code. If the structure is changed, OutSystems’ TrueChange will not alert you that the corresponding JSONPath expression is invalid and needs to be changed.
Option 2 - Auxiliary IsNull Fields
The second configuration will manipulate the incoming data to create an extra auxiliary boolean field for each attribute (with the original field’s name suffixed with _IsNull), indicating whether the attribute is null.
- OnAfterResponse
Add the OnAfterResponse event to the consumed REST API. After the assign to set the CustomizedResponse, which is automatically added to the flow when the event action is created, add the JSON_SetIsNullFields action (from the JSON Null Utils component) and set the JSON input to the ResponseText. Finally, assign the output of the JSON_SetIsNullFields action to the CustomizedResponse ResponseText.

Image 13 – Assign the output of the JSON_SetIsNullFields action to the CustomizedResponse ResponseText
The JSON_SetIsNullFields action manipulates the ResponseText and adds an extra auxiliary boolean field for each attribute (with the original field’s name suffixed with _IsNull), indicating whether the attribute is null.
- Output Parameters
To access the newly created auxiliary fields, the structure of the output parameter must be changed to include the new fields.

Image 14 – Including the newly created auxiliary fields in the structure of the output parameter
For each field, add the corresponding auxiliary field, set the name to the original field’s name suffixed with _IsNull, and set the type to boolean.
- Results
By comparing the original and updated responses (obtained using the OnAfterResponse event) and the corresponding OutSystems output variable values, we can see that, although the Value field has the value zero in both examples, the auxiliary field is False if the value was not null and True if it was.
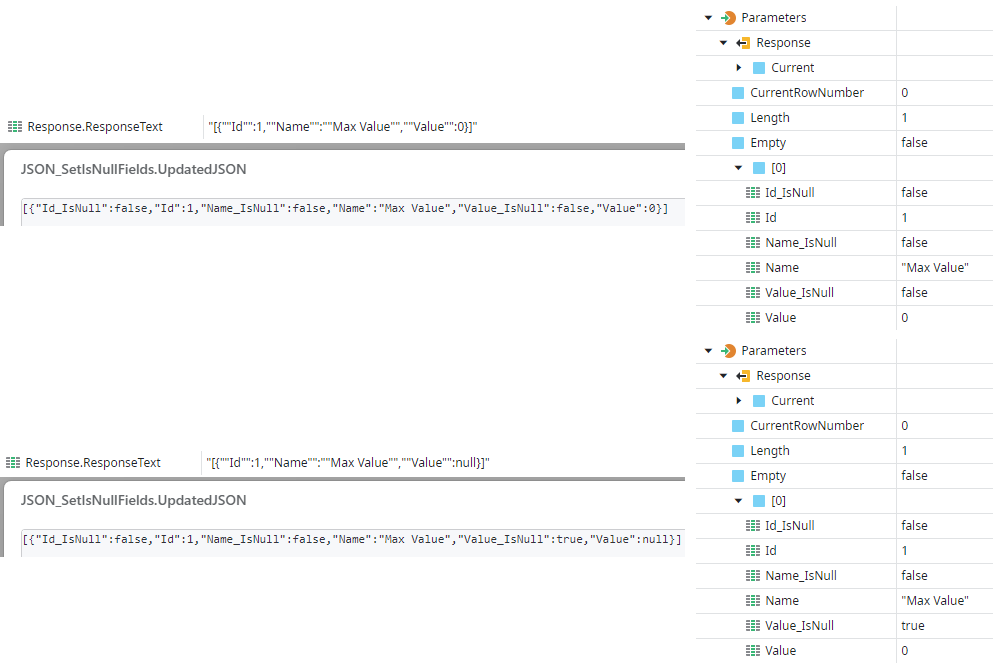
Image 15 – Comparing the original and updated responses
This approach allows developers to validate if a particular field’s value is null, using the auxiliary boolean fields without the need to hardcode JSONPath expressions in the application’s code. However, developers must remember that if the structure changes, the corresponding auxiliary fields must also be adapted.
The previous example is of a REST API provided by another system that is consumed by the OutSystems platform. However, when implementing the same logic to an exposed REST API in the OutSystems platform, the documentation and corresponding swagger will become polluted with the extra fields. This happens because we changed the input/output structures to include the auxiliary fields.
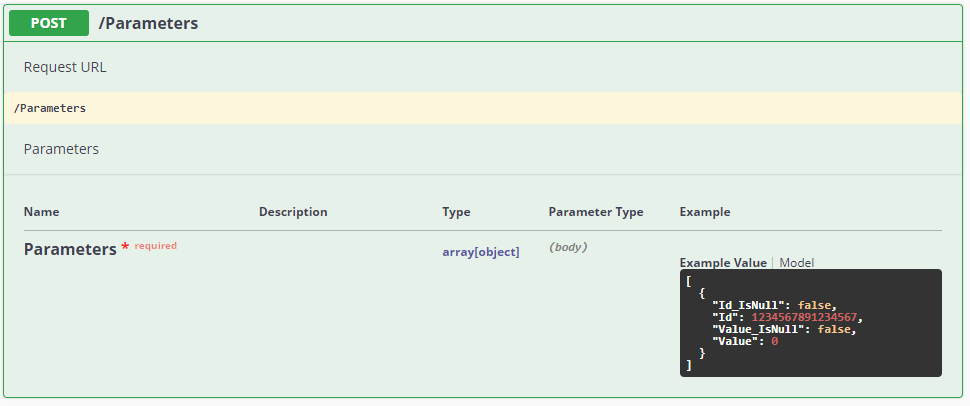
Image 16 – The internal auxiliary fields become exposed to consumers
This may cause some confusion to the consumers of the REST API. While the documentation indicates that the auxiliary fields are part of the API, in reality, they are not. They are only internal auxiliary fields and should not be exposed to consumers. Depending on the consumers of the APIs this may or may not be an issue. To avoid this issue, check the next option.
Option 3 - Auxiliary IsNull Fields (clean REST documentation)
The third configuration slightly modifies the previous approach to avoid polluting the REST API documentation with the extra fields. The main difference is that the creation of the new fields is moved from the OnAfterResponse to the corresponding action of each REST API Method. This way, the new fields do not affect the REST API documentation.
- OnRequest
Add the OnRequest event to the exposed REST API. After the assign to set the CustomizedRequest, which is automatically added to the flow when the event action is created, add the JSON_IsNull_Init action (from the JSON Null Utils component) and set the JSON input to the RequestText.

Image 17 – Add the JSON_IsNull_Init action after the assign setting of the CustomizedRequest
The JSON_IsNull_Init action will parse the incoming request and store an internal object that will be used later to populate the auxiliary boolean fields.
- Input Parameters & Local Variables
To keep the documentation and corresponding swagger clean, we must not include the auxiliary fields in the input/output structures of the REST API Method. Instead, create a new local variable that will hold the auxiliary fields.

Image 18 – Creating a local variable holding the auxiliary fields
- REST API Method Action
To populate the local variable, first call the JSON_SetIsNullFields action but leave the JSON input parameter empty. When the input parameter is empty, this action will try to use the data that was passed to the JSON_IsNull_Init action on the OnRequest event.
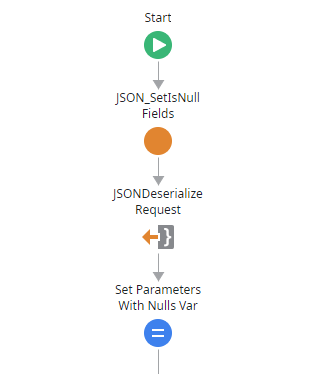
Image 19 – Populating the local variable
Deserialize the output of the JSON_SetIsNullFields action (using the local variable data type) and finally assign the result to the local variable. From now on, you can ignore the input parameter and use the local variable in your logic.
- Results
With this approach, the exposed REST API’s documentation and corresponding swagger will remain clean without any of the auxiliary fields.

Image 20 – The internal auxiliary fields are not exposed to consumers
While this approach avoids polluting the documentation and corresponding swagger, it requires some additional effort as the JSON_SetIsNullFields action and consequent deserialization will have to be added to the beginning of all methods of the REST API (at least for the methods that require the validation if a field is null). Furthermore, there is also the need to maintain two near-identical structures for the inputs/outputs of the REST API — one for the inputs/outputs and another for the local variables.
Sending data
There are two possible configurations for handling outgoing data. Depending on your needs, one may better suit your use case than the other.
The following examples are of a REST API provided by another system that is consumed by the OutSystems platform. However, the same results can be achieved when exposing a REST API in the OutSystems platform by applying the same logic to the responses of the exposed API.
Option 1 - Auxiliary IsNull Fields
The first configuration will manipulate the outgoing data, setting fields to null that have a corresponding auxiliary boolean field (fields with a name suffixed with _IsNull) set to True and then removing the auxiliary boolean fields.
- OnBeforeRequest
Add the OnBeforeRequest event to the exposed REST API. After the assign to set the CustomizedRequest, which is automatically added to the flow when the event action is created, add the JSON_RemoveIsNullFields action (from the JSON Null Utils component) and set the JSON input to the RequestText. Finally, assign the output of the JSON_RemoveIsNullFields action to the CustomizedRequest RequestText.

Image 21 – Logic in the OnBeforeRequest event
The JSON_RemoveIsNullFields action manipulates the RequestText setting fields to null that have a corresponding auxiliary boolean field (fields with a name suffixed with _IsNull) set to True, then removes the auxiliary boolean fields.
- Input Parameters
To be able to control which fields are null, the input parameter must be changed to include the new auxiliary fields.
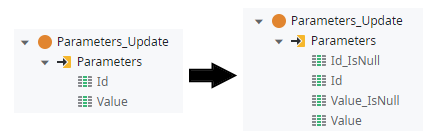
Image 22 – Change the input parameter to include the new auxiliary fields
For each field, add the corresponding auxiliary field, set the name to the original field’s name suffixed with _IsNull, and set the type to boolean.
- Results
By comparing the OutSystems variable values and the corresponding original and updated requests (obtained using the OnBeforeRequest event), we can see that, although the Value field has the value zero in both examples, in the updated request, this field is not modified if the auxiliary field value is False, and is set to null if the auxiliary field value is True. Finally, all auxiliary fields are not present in the updated request.

Image 23 – Comparing the OutSystems variable values and the corresponding original and updated requests
This approach allows developers to set a particular field’s value as null using the auxiliary boolean fields.
The previous example is of a REST API provided by another system that is consumed by the OutSystems platform. However, when implementing the same logic to an exposed REST API in the OutSystems platform, the documentation and corresponding swagger will become polluted with the extra fields. This happens because we changed the input/output structures to include the auxiliary fields.
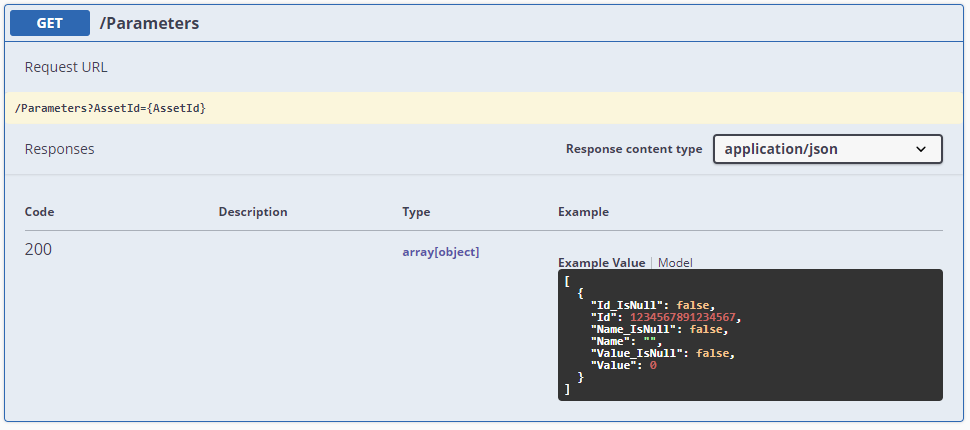
Image 24 – The internal auxiliary fields become exposed to consumers
This may cause some confusion to the consumers of the REST API. While the documentation indicates that the auxiliary fields are part of the API, in reality, they are not. They are only internal auxiliary fields and should not be exposed to consumers. Depending on the consumers of the APIs, this may be an issue. To avoid this issue, check the next option.
Option 2 - Auxiliary IsNull Fields (clean REST documentation)
The second configuration slightly modifies the previous approach to avoid polluting the REST API documentation with the extra fields. The main difference is that the removal of the auxiliary fields is moved from the OnBeforeRequest to the corresponding action of each REST API Method. This way, the auxiliary fields do not affect the REST API documentation.
- Input Parameters & Local Variables
To keep the documentation and corresponding swagger clean, we must not include the auxiliary fields in the input/output structures of the REST API Method. Instead, create a new local variable that will hold the auxiliary fields.
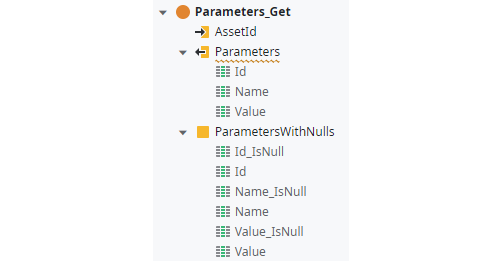
Image 25 – Creating a local variable holding the auxiliary fields
- REST API Method Action
In the REST API Method action, instead of using the output parameter in your logic, set all values to the local variable. At the end of the action, serialize the local variable and then call the JSON_RemoveIsNullFields action (from the JSON Null Utils component) using the serialized JSON as its input.
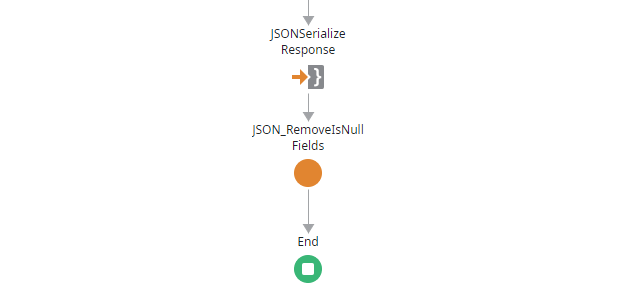
Image 26 – Serializing the local variable and removing the null fields
- OnResponse
Finally, add the OnResponse event to the exposed REST API. After the assign to set the CustomizedResponse, which is automatically added to the flow when the event action is created, add the JSON_RemoveIsNullFields_GetLastResult (from the JSON Null Utils component) and assign the output to the CustomizedResponse ResponseText.
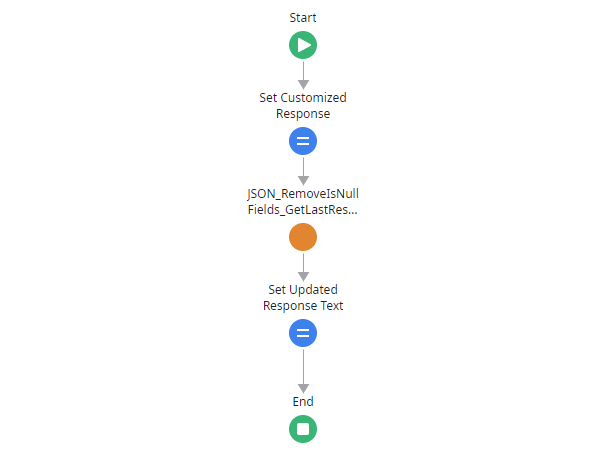
Image 27 – The OnResponse event logic
The JSON_RemoveIsNullFields_GetLastResult will get the result from the last call to the JSON_RemoveIsNullFields action, which was called at the end of the REST API Method action.
- Results
With this approach, the exposed REST API’s documentation and corresponding swagger will remain clean without any of the auxiliary fields.
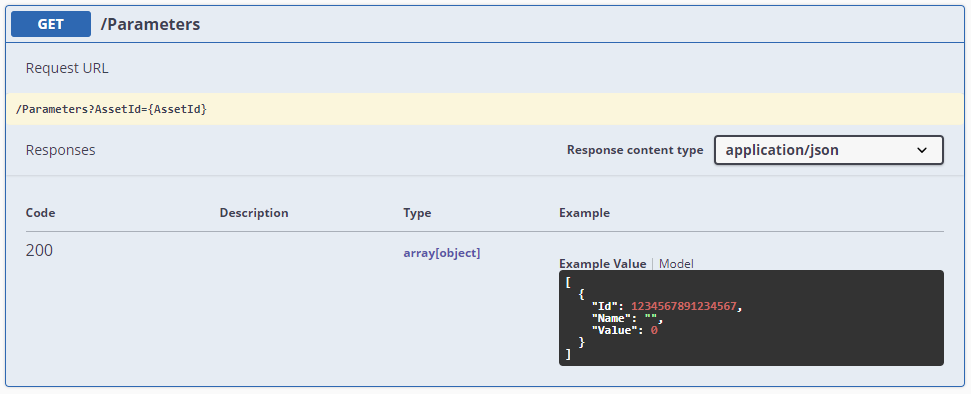
Image 28 – The internal auxiliary fields are not exposed to consumers
While this approach avoids polluting the documentation and corresponding swagger, it requires some additional effort as the serialization of the local variable and JSON_RemoveIsNullFields action will have to be added to the end of all methods of the REST API (at least for the methods that require setting fields as null). Furthermore, there is also the need to maintain two near-identical structures for the inputs/outputs of the REST API — one for the inputs/outputs and another for the local variables.
Conclusion
This article explores how to handle null values in the OutSystems Platform using the JSON Null Utils forge component, allowing developers to distinguish which fields have values and which don’t. Because each case is different, the pros and cons of each potential solution should be carefully considered. While the options presented in this article are certainly not a silver bullet, hopefully, they will be another tool in your toolbox so that you can seamlessly integrate with external systems that support/require null values.
References
Like this article? Share it:


